David Agnew
Member
- Messages
- 285
Well, a few weeks back, I did a major cleaning job in my shop/garage. I realized how much leftover PT wood I have from building my deck. That lead to Adirondack Chair Thread. The overwhelming response there and generosity of plans basically FORCES me to make a couple chairs. Hundreds of photos were requested. 
These are not those photos.
I just came to realize I hadn't posted followups on a lot of the things all you folks have helped me with over the... wow! Years, now. All these photos were taken this morning.
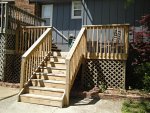
Here's a photo of the DECK you guys helped design:

Thread: CLICK HERE
There are some things I'd do differently, but I learned a long time ago that that's how I learn. By trial and (mostly) error! The stairs were really interesting because the patio is sagging there. The stairs are square and plumb, but the right stringer is about 1.25" longer than the left!!
I finished it up in April/May of 2013.
Here's photos of the MISSION TABLE LAMPS you guys helped design:


Thread: CLICK HERE
I made a pair because SWMBO wanted matching bedside lamps. Frankly, I'm not 100% satisfied with them... possibly not 95% satisfied. The bases are cherry and they're just so washed out and muddy. The grain isn't popping at all. Of course, it's cherry, so there's not much grain to pop. I think I need to build a few more using 100% QS white oak. I may also go back and ease the edges a little. I worked very hard to make sure all the corners were nice and sharp... but it seems like sharp corners make it look 'unfinished' somehow. Maybe the next ones will have "real" Arts & Crafts shades w/ panels, but these $9 craft store shades work well too. Yup - all in, wood, hardware, wiring, shades, each of these is only about $35. Plus labor, of course!
These lamps were finished in March 2014.
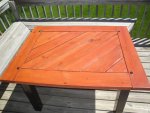
This OUTDOOR TABLE is one FWW didn't help design, but did help inspire. No particular project specifically inspired it, but SMWBO wanted some $300 plastic and aluminum deck table from Sears and I said to myself, I CAN DO THAT! It was also my first attempt at "getting rid of all this darn PT in the garage!"
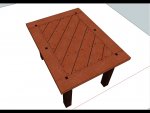
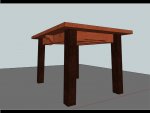
Sketchups:


Photos:


This is made from 99% PT wood. The plugs are sliced from a SPF closet rod. The colors are just Lowes Olympic deck stains. Solid for the legs and 'Redwood' semi-transparent for the top. Everything was then covered with 2-3 coats of Minwax Spar Varnish.
It's somewhat Greene & Greene inspired, but my reach vastly exceeds my grasp at the moment. All the cross members are mortised into the side rails and there's a sad little attempt at a cloud lift in each end rail. The center rail was originally inspired by an eagle head, like you see on a totem pole, but I couldn't get the jig-saw to do my bidding so it became a simple double arch shape. Cutting the diagonal boards was an adventure but came out pretty well. The picture frame is not breadboarded, but is doweled and glued together.
The legs are each angled outwards 2* in both directions which required compound cuts to the top and bottom of each leg and the ends of each skirt piece. I'm quite proud of how that came out; the pictures don't do it justice. The slight splaying of the legs somehow gives the table strength and mass. I am also quite happy that it came out FLAT! It's quite stable and not wobbly or tippy at all. 4 legs exactly the same length.
I finished this table 10/30/2013, just in time for a Halloween party. It's been outdoors ever since. It's seen a long, hard winter and is about to go through a long, hard summer. I think it will be interesting to see how well/poorly the finish holds up. I expect to need to sand/seal it next spring.
I do have one additional finished project floating around out there, the Rocket Ship Bookcase, but I'll need to run over to my buddy's to acquire photos.
Thanks, everyone, again for all the assistance and kind words. I've finished up the Adirondack Design and will be posting that soon.
These are not those photos.
I just came to realize I hadn't posted followups on a lot of the things all you folks have helped me with over the... wow! Years, now. All these photos were taken this morning.
Here's a photo of the DECK you guys helped design:
Thread: CLICK HERE
There are some things I'd do differently, but I learned a long time ago that that's how I learn. By trial and (mostly) error!
The stairs were really interesting because the patio is sagging there. The stairs are square and plumb, but the right stringer is about 1.25" longer than the left!!I finished it up in April/May of 2013.
Here's photos of the MISSION TABLE LAMPS you guys helped design:
Thread: CLICK HERE
I made a pair because SWMBO wanted matching bedside lamps. Frankly, I'm not 100% satisfied with them... possibly not 95% satisfied. The bases are cherry and they're just so washed out and muddy. The grain isn't popping at all. Of course, it's cherry, so there's not much grain to pop. I think I need to build a few more using 100% QS white oak. I may also go back and ease the edges a little. I worked very hard to make sure all the corners were nice and sharp... but it seems like sharp corners make it look 'unfinished' somehow. Maybe the next ones will have "real" Arts & Crafts shades w/ panels, but these $9 craft store shades work well too. Yup - all in, wood, hardware, wiring, shades, each of these is only about $35. Plus labor, of course!
These lamps were finished in March 2014.
This OUTDOOR TABLE is one FWW didn't help design, but did help inspire. No particular project specifically inspired it, but SMWBO wanted some $300 plastic and aluminum deck table from Sears and I said to myself, I CAN DO THAT! It was also my first attempt at "getting rid of all this darn PT in the garage!"
Sketchups:
Photos:
This is made from 99% PT wood. The plugs are sliced from a SPF closet rod. The colors are just Lowes Olympic deck stains. Solid for the legs and 'Redwood' semi-transparent for the top. Everything was then covered with 2-3 coats of Minwax Spar Varnish.
It's somewhat Greene & Greene inspired, but my reach vastly exceeds my grasp at the moment. All the cross members are mortised into the side rails and there's a sad little attempt at a cloud lift in each end rail. The center rail was originally inspired by an eagle head, like you see on a totem pole, but I couldn't get the jig-saw to do my bidding so it became a simple double arch shape. Cutting the diagonal boards was an adventure but came out pretty well. The picture frame is not breadboarded, but is doweled and glued together.
The legs are each angled outwards 2* in both directions which required compound cuts to the top and bottom of each leg and the ends of each skirt piece. I'm quite proud of how that came out; the pictures don't do it justice. The slight splaying of the legs somehow gives the table strength and mass. I am also quite happy that it came out FLAT! It's quite stable and not wobbly or tippy at all. 4 legs exactly the same length.
I finished this table 10/30/2013, just in time for a Halloween party. It's been outdoors ever since. It's seen a long, hard winter and is about to go through a long, hard summer. I think it will be interesting to see how well/poorly the finish holds up. I expect to need to sand/seal it next spring.
I do have one additional finished project floating around out there, the Rocket Ship Bookcase, but I'll need to run over to my buddy's to acquire photos.
Thanks, everyone, again for all the assistance and kind words. I've finished up the Adirondack Design and will be posting that soon.