Carol Reed
In Memoriam
- Messages
- 5,533
- Location
- Coolidge, AZ
This part should catch up to where I am, so it will be long. But lots of pictures. ")
To begin, here are my main go to tools and the redneck sharpening station I set up.


To sharpen (often) I simply slide the back of the chisel on the 240 grit PSA sandpaper 3-4 times. Then I draw the bevel side backwards twice. Works real well.
So I began with a side header. I cut the 16' 4x4 down to 15" long.

Then I cut 2 16' to 8' lengths for the 4 posts. They each needed a 2x2x2 1/2" tenon on one end. I needed some practice first. I can tell you muscling 16' 4x4's around is not work for an old lady. Had to get into the Aleve bottle. Dimension lumber is wet and very heavy.
I used the 1 foot cut off to make a sample tenon. I cut the shoulders of the tenon with the SCMS to 3/4" deep. Then I cut the cheeks by hand with the pull saw. This was not particularly accurate or acceptable.

I decided to face off the tenon cheeks with a router.

I set the bit depth to 3/4" and put a Big Foot base on my router. You can find plans for that in my router book, Router Joinery Workshop. The issue with this is that I am measuring waste with the idea of having a finished part to the correct dimensions. This is a real good place not to assume anything! But we prevailed. Cutting the tenons by hand was way too much work! I had lots more tenons to cut. I decided to borrow a friend's band saw for the next batch, as mine is unavailable. But I did get the posts done the hard way.

Now I went after the housed mortises in the headers to receive the posts. Since I finally had tenons all the same size I could use my sample tenon to measure and mill the mortises. Turns out that process needs some work before I mill the rest of them, too.
I marked out the mortise by drawing the outline and setting the lines with the chisel. Then I drilledl four 1" holes with a new spurred spade bit.


Then chop the waste with the sharp chisel.
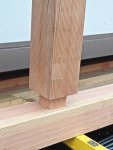
Now the housing part. I inserted the test tenon and marked the edges of the housing and hand cut to 1/2" deep. Back to the router, this time set to 1/2" and cleaned out the housing face.

Ooops. Hit the picture limit.
To be continued.
To begin, here are my main go to tools and the redneck sharpening station I set up.
To sharpen (often) I simply slide the back of the chisel on the 240 grit PSA sandpaper 3-4 times. Then I draw the bevel side backwards twice. Works real well.
So I began with a side header. I cut the 16' 4x4 down to 15" long.
Then I cut 2 16' to 8' lengths for the 4 posts. They each needed a 2x2x2 1/2" tenon on one end. I needed some practice first. I can tell you muscling 16' 4x4's around is not work for an old lady. Had to get into the Aleve bottle. Dimension lumber is wet and very heavy.
I used the 1 foot cut off to make a sample tenon. I cut the shoulders of the tenon with the SCMS to 3/4" deep. Then I cut the cheeks by hand with the pull saw. This was not particularly accurate or acceptable.
I decided to face off the tenon cheeks with a router.
I set the bit depth to 3/4" and put a Big Foot base on my router. You can find plans for that in my router book, Router Joinery Workshop. The issue with this is that I am measuring waste with the idea of having a finished part to the correct dimensions. This is a real good place not to assume anything! But we prevailed. Cutting the tenons by hand was way too much work! I had lots more tenons to cut. I decided to borrow a friend's band saw for the next batch, as mine is unavailable. But I did get the posts done the hard way.
Now I went after the housed mortises in the headers to receive the posts. Since I finally had tenons all the same size I could use my sample tenon to measure and mill the mortises. Turns out that process needs some work before I mill the rest of them, too.
I marked out the mortise by drawing the outline and setting the lines with the chisel. Then I drilledl four 1" holes with a new spurred spade bit.
Then chop the waste with the sharp chisel.
Now the housing part. I inserted the test tenon and marked the edges of the housing and hand cut to 1/2" deep. Back to the router, this time set to 1/2" and cleaned out the housing face.
Ooops. Hit the picture limit.
To be continued.