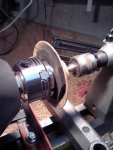
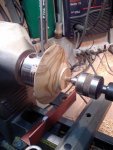
Turning off the Tenon

Stuart Ablett

Member
Messages
15,917
Location
Tokyo Japan
Well there seemed to be some interest in turning off the tenon on the bottom of a bowl, I was doing one tonight, so I took some pics.
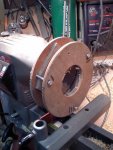
dount_chuck.jpg
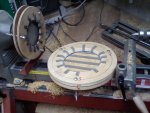
here is my smaller Donut chuck

dount_chuck_rings.jpg
I have a variety of rings for it, as well as an uncut blank or two.
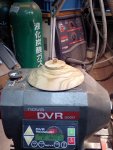
little_cherry_ready_to_turnoff_tenon.jpg
Here is a small Cherry bowl I was just about finished, I only needed to turn off the tenon on the bottom.
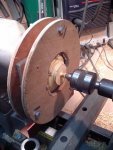
dount_chuck_ring_too_small.jpg
I put the bowl in the chuck, but I was not happy with the size of the hole, it was a little small, it would not allow me access to the tenon and the sanding later, so I needed to make another ring with a bit larger hole in it.
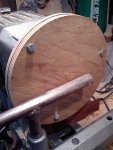
dount_chuck_new_ring_marked.jpg
I have some blanks for just this purpose, when I made the donut chuck, I cut 4 or 5 flat rounds for it, and as I need, I make new rings. All of the blanks were drilled and indexed together, so making a new ring is easy, just line up the mark, and bolt the ring to the face of the chuck, then cut a new hole in the new blank.

dount_chuck_new_ring_cut.jpg
Here I have cut a new hole, I left the ring with the smaller hole in place, as I did not want to damage the foam on the flat of the chuck.

dount_chuck_new_ring_ready.jpg
I then put a round over on the inside of the ring, by hand with a sharp knife, and attach some weather stripping stuff to the ring to protect the bowl.
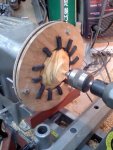
little_cherry_centering_in_chuck.jpg
Here I've centered the bowl in the new ring, using the tail stock. You can see that this ring will allow me greater access to the bottom of the bowl

little_cherry_bottom_turned_in_chuck.jpg
I then turn off the tenon..........

little_cherry_bottom_sanded_in_chuck.jpg
...and sand it, as well as put a coat of sanding sealer on it......

Cont............
 
.............

little_cherry_bottom_top_800.jpg

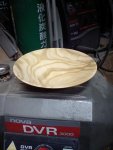
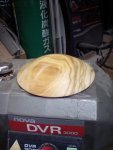
here is the bowl ready for some hand sanding, then a coat or two of spray on lacquer, some buffing and some wax.....

little_cherry_bottom_sanded_800.jpg
The bottom of the bowl

big_little_donut_chucks.jpg
here is my other donut chuck, a little bit bigger for bigger bowls, and the plywood is thicker too.

Works well.

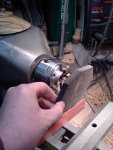
The other way, maybe simpler way is to just use your normal 4 jaw chuck as a jam chuck

jamb_chuck_padding.jpg
I have a piece of foam all cut and ready to do this.

jamb_chuck_padding_installed.jpg
here you can see the foam padding on the inside of the bowl, protecting it from the 4 jaw chuck

jamb_chuck_centered.jpg
Here the jam chuck is ready to use, but, on this bowl, I left the center nub, on the tenon, way to small, and the nub would most likely break off, causing bad words to be said.

This method works well too, you usually have to do a bit more hand sanding but that is no big deal.

Hope this helps.

Cheers!
 
Being a Clutz....I prefer the donut method but on some spindle work I will turn away the tenon with either a parting tool or my skew with the lathe speed turned down; supporting the turned object with one hand and the tool doing the parting with the other hand. Note ...I generally hold my breath while I do this.....:D
 
Ken on spindle work, with a live center, not a cupped center, I'll do that too, no problem, little trick, just as it gets close, give your tail stock half a crank, and often when the last little nub is cut, the cut off piece pauses for a second, then keeps on spinning, just from the friction.

A little nerve wracking at first, but I find it works well.

Cheers!
 
Stuart,

Maybe I'm one of those lop-sided people. I built a donut set-up because I'd seen one posted somewhere. But, I have a great deal of difficulty getting the piece centered perfectly.

How to you assure that you are 'right-on'?
 
Sandy, you NEVER get it perfect, you get it real close, make the chuck fairly loose, so it is applying just a bit of pressure on the bowl, move the tail stock up, and put the live center tip into the hole on the nub, while doing this, slowly rotate the chuck and bowl by hand, when it looks fairly goo, tighten up each bolt a bit at a time.

once I get it fairly tight, I turn the lathe on at maybe 500 rpm (while standing out of the line of fire, just in case ;)) and take a look, if it is really wonky, have another go.

The thing is to not do a lot of cutting on the area that is NOT the tenon, if that makes sense, and the cutting that you do, is very light, then you use the #80 grit gouge to blend the two areas :rolleyes:

Cheers!
 
And don't we all LOVE that 80 grit gouge.

Reminds me of a golfing incident when I was in a sandtrap and resorted to a 'hand wedge' to get out.

Thanks - my patience doesn't usually allow for a lot of tweaking and twiddling. I have to start relaxing more and 'git rid of my "Git 'r done" attitude'.:rolleyes: :rolleyes:
 
new guy to turning so ignore stupid statements...

i saw this article in april 2007 popular woodworking on a longworth chuck. it looked like it would answer my question of how to hold a bowl to finish off the base or foot. so i built one following that article.

View attachment 8074

View attachment 8075

this is a small chuck so only room for four buttons. a larger chuck would take six buttons. the mounting is hickory with threads so it mounts directly to the headstock.

one of the things that seems at odds with this design is that the buttons must be slightly loose to tighten the chuck on the workpiece by rotating the two plates. then you tighten the buttons with the wing nuts. if the buttons are not uniformly loose when you rotate the two parts of the chuck it seems they would pull the piece off center when tightening the wing nuts.

anyone have experience with such a device???
 
Last edited:
Greetings Clark, welcome to the family! :wave:

The Longworth chucks have been around for a while and generally get great marks!

I've not made one............. yet, but I will, at some point :rolleyes:

Your little one looks good, nice and smooth, how does it work?

I've seen even larger ones with only 4 buttons, but usually they have 8. I understand that they are really only for finishing the bottom, no heavy cuts of any sort, as they are only holding by them little rubber buttons.

To center a piece on the Longworth chuck, it would be best to bring the tailstock up and use that to center it, then rotate the two plates of the Longworth chuck to tighten it up. If you don't have that little nubbin on the foot of the bowl to center with the tailstock, then I guess you will have to root around a bit to get the best center you can find.

Again, Welcome, and thanks for posting with pics!! :thumb:

Cheers!
 
Clark, I've got a Longworth chuck. Gimme a bit of time to take a few snapshots, and I'll start a thread about it. I've found it to be useful, but a bit limited. Like Stu said, light cuts only, and in my limited experience there is still some tweaking and compromise to be done as far as getting the piece exactly centered. (Much like the donut. The 80 grit gouge saves the day.) ;) I use the live center to get it as close to centered as I can, and try to get the foot as finished as feasible before removing the tailstock, which is left on the last little 1/4" or so diameter nubbin. The longer I can keep the tailstock in place, the lower the odds of me launching the piece. (The only time I've been hit by a flying bowl was using the Longworth chuck, so I'm a but leery.)

Oh, and welcome aboard. :wave: Glad to see we finally got you in...always nice to add a turner to the Family.
 
Nice chuck, Stu. I made one similar a while back, which I glued some foam to prevent damaging the bowl. The weather stripping you used would work better IMHO - I'll have to try that out when I cut the next hoop.

I counter sunk the bolts to I woundn't band my hands on them - that would be nasty!

One addition feature that you could add is to help turning the bottoms of hollow forms. All you need to do is glue a block in the middle of the main body and turn it to a cone. Your hollow form then has a locator to center it perfectly, and it won't interfere with your bowls.
 
...One addition feature that you could add is to help turning the bottoms of hollow forms. All you need to do is glue a block in the middle of the main body and turn it to a cone. Your hollow form then has a locator to center it perfectly, and it won't interfere with your bowls.
Great idea, Gari. I'll probably steal that one from you. :thumb:
 
how does it work?

well, it centers the part pretty well as i was careful in machining the slots. but the rubber buttons are too soft. i followed the article and used rubber leg "bumpers" with wood dowels inserted to give something to bolt through.

so i've made soft wood (poplar) discs of a larger dia. to allow smaller pieces to be held.
View attachment 8199

notice the numbers on each disc and on the plate. that's to get them back in the same slots. also note arrows pointing to the piece part. that's the orientation where all these hand turned discs had the same clearance to the toolrest when brought up this jig. finally, notice adhesive back sandpaper strips at the mounting points. the sandpaper tells you these wood buttons still aren't the answer. maybe more slope at the O.D. or thicker buttons?

the part shown in the jig would be the top of a candle holder i'm trying to dope out. about 3" O.D. and you can see how thin. here's the candle holder i'm trying to work out.
View attachment 8200
it was made on my legacy ornamental mill. it needs a base and a top, made on a lathe. maybe in contrasting ebony?? so i need a way to hold these small thin discs to machine depressed areas to fit the main body of the candleholder and for a candle mounting.

am rethinking this last part. maybe what i should do is mount the piece part with a small faceplate, machine one end. then remount to a machined wooden mounting disc with glue -using brown paper interface-turn the O.D. and depression on the visible end. then knock off. i've used a brown paper interface with yellow glue and it works very well. dried glue would have to be removed but that surface wouldn't show(glued to the main body).

as i said in my first posting..am new to turning so be tolerant of stupid comments.
 
Last edited:
Clark, have you looked at the double sided turner's tape, or the hot melt glue?

I've not tried either, but I have read about others that have.

Just a thought.

Cheers!
 
Clark, I went through a couple different types of rubber feet before finding some that work pretty well for my chuck. (I still need to post some pics.) The ones I have now started out bigger, but I trimmed them down. Still, I'm pretty sure mine wouldn't hold what you're trying to hold. Since I'm suspecting a vacuum chuck is not available to you, I think your glue idea (or Stu's tape suggestion) is your best bet.
 
Clark, have you looked at the double sided turner's tape, or the hot melt glue?

I've not tried either, but I have read about others that have.

Just a thought.

Cheers!

I haven't tried the double stick tape, but have done the hot glue thing. A woodturning club member introduced us to this, very simple, technique. Simple, use an aluminum faceplate (which can be small e.g. 4" or 6"), apply a bunch of hot melt glue, set your bowl-in-progress face down on the bench with the bottom flattened (facing up, of course). Put the aluminum faceplate on the bowl bottom as centered as possible. Heat with a propane torch and use a scrap hunk of wood the push down on the plate. Hold for a minute then let cool. This holds so well it couldn't be taken off with an act of Congress. To remove simply heat the aluminum. Don't ask me why, but most of the glue will stay on the aluminum and very little will stick to the wood. What does can be removed easily. Grizzly sells inexpensive aluminum faceplates.
 
good idea...would have never thought of that.

if i wanted the finished pieces to be close to 3" dia and if i could buy a faceplate at 3"...would make centering the parts even easier?? i changed my story from bowls to these little thin plates that i need to turn on both sides to finish out a candle holder but that tip should work well on those too.

i'll lie low for now and come back to you guys with another question on skews. skews and i don't get along.
 
All Hail The Mighty Skew!!

Skews can really suck, I used to call mine "The Evil Skew" and kept it locked in a box, in a drawer, where it could not jump out and bite me!! :eek:

Then I had to turn some table legs for a DIY magazine here in Japan, DoPa 2007 and I had to learn how.

I read the various books I own, and was doing so-so, then I got the Alan Lacer video, the second one, "Son of Skew" which is more advanced techniques etc, but still, seeing him use that skew, on the video, it was an epiphany, unreal, the difference it made to see it in use (via video) and I was hooked, I now love the skew, I've not mastered it by any stretch of the imagination, but it no longer scares me at all, it is a trusted tool in my arsenal!!

One thing more I'll say about the skew, when you have a catch (notice I did NOT say "if") it is a bit nerve wracking, but, the tool is pushed away from the work, rarely does anything happen besides some bad words being said, and an ugly mark on the work piece, it is not like on a bowl, when a catch can break tools, tool rests, and or the bowl you are working on, as well as launch any of these items to bounce around your shop for a few minutes. A catch with the skew on spindle work is a lot less dramatic, and or traumatic. :thumb:

Buy the first Alan Lacer video/DVD

Cheers!


Top