Jim C Bradley
Member
- Messages
- 4,945
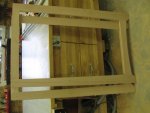
well today i had fun and its glenns fault againwe have seen glenn use one of those mortis pal jigs so much that i finally gave in when he posted his thread on them and how he uses them.. so today i put mine to use..and used a new tool for the glue relief part
View attachment 88964
Larry,
Just how many cans of beer have you opened with this opener???
I hope you Enjoyed them,
JimB
 I've also started to consider getting rid of my mortiser. Although I like the ability to drill square holes easily, I cut so few mortises that I find it hard to justify the storage space for the machine.