5 string jazz bass build

Dave Black

Member
Messages
638
Location
Central PA
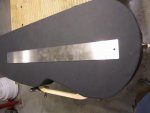
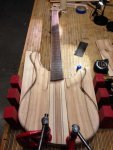
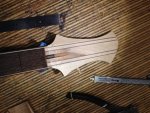
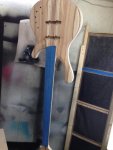
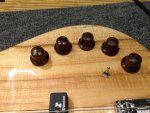
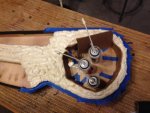
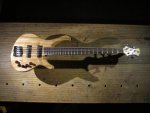
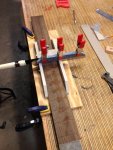
I decided october 9th 2014 that I should build myself a new bass, so I bought some pickups from eBay which lead to buying tuning machines, then an onboard preamp and bridge and strap locks and all the rest. So november 15th I started making some saw dust. These pics are in rough order of how things went together. This build made me realize that my 14" walker turner wasn't up to resawing 6" so I did make a small field trip to grizzly for a G0513x2. I was going to get the anniversary edition but I talked myself into the x2 because of the blade guides and cast iron wheels etc. etc. but thats another thread.

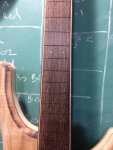
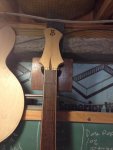
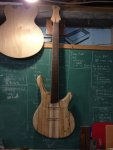
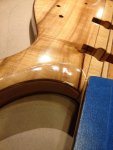
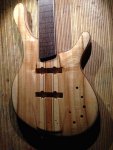
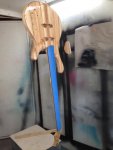
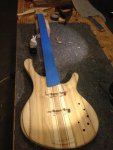
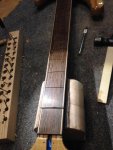
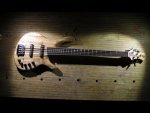
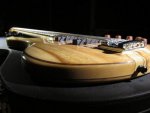
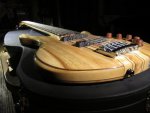
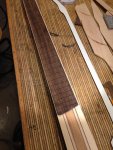
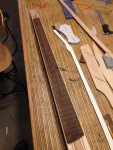
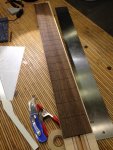
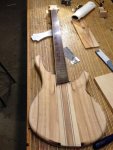
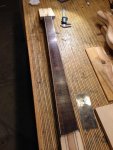
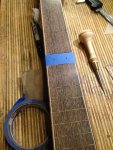
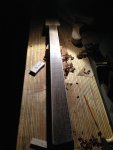
The whole bass is maple with walnut strips, The top is book matched heartwood curly maple, all the maple came from my wifes aunts farm, and the walnut came from the woods by my house. The neck is a 5 piece neck or 9 piece if you count the thin walnut strips. The fingerboard is wenge, this was the first guitar that I made the fingerboard from scratch, the others I bought pre radiused and slotted fingerboards. I made a miter box for the slotting saw which luckily was on sale at woodcraft when I needed it.
 

Attachments

  • IMG_1265.jpg
    IMG_1265.jpg
    54.5 KB · Views: 20
  • IMG_1294.jpg
    IMG_1294.jpg
    93.9 KB · Views: 16
  • IMG_1293.jpg
    IMG_1293.jpg
    72.5 KB · Views: 15
  • IMG_1289.jpg
    IMG_1289.jpg
    90.3 KB · Views: 19
  • IMG_1288.jpg
    IMG_1288.jpg
    57.2 KB · Views: 18
  • IMG_1287.jpg
    IMG_1287.jpg
    63.8 KB · Views: 18
  • IMG_1286.jpg
    IMG_1286.jpg
    80.9 KB · Views: 20
  • IMG_1269.jpg
    IMG_1269.jpg
    75.2 KB · Views: 16
  • IMG_1268.jpg
    IMG_1268.jpg
    57.5 KB · Views: 19
Last edited:
More pics, I messed with finishing the fingerboard with ca glue, I like the idea but will do it different next time as the way I applied it this time gave me unevenness which I had to sand back. I put a few drops in the board then wiped it around, so in the spots where I dropped the ca on it was thicker and you can see the difference in the shine.
 

Attachments

  • IMG_1316.jpg
    IMG_1316.jpg
    74.6 KB · Views: 27
  • IMG_1315.jpg
    IMG_1315.jpg
    63.1 KB · Views: 16
  • IMG_1314.jpg
    IMG_1314.jpg
    85.6 KB · Views: 19
  • IMG_1313.jpg
    IMG_1313.jpg
    55 KB · Views: 15
  • IMG_1312.jpg
    IMG_1312.jpg
    94.1 KB · Views: 18
  • IMG_1311.jpg
    IMG_1311.jpg
    50.8 KB · Views: 17
  • IMG_1310.jpg
    IMG_1310.jpg
    65.5 KB · Views: 17
  • IMG_1309.jpg
    IMG_1309.jpg
    53.7 KB · Views: 15
  • IMG_1307.jpg
    IMG_1307.jpg
    60.6 KB · Views: 16
  • IMG_1306.jpg
    IMG_1306.jpg
    72.3 KB · Views: 18
It's gonna be another beauty, Dave. Wenge is splintery stuff, but your fret slots look perfect. Would love to see some close ups of your slotting fixture/miter box. It looks like you built it from Corian? Does it have some sort of indexing pin to position the fret template? I want to build some cigar box guitars/ukes and don't want to spend a lot of money at stew mac just to cut a few finger boards.
 
Oooooooooo - so cool! :lurk::lurk::lurk::lurk::lurk::lurk::lurk::lurk::lurk:

You're gonna love that 513x2 -- i love mine. Keep yer 14" though... if you haven't gotten rid of it already and can find room. It's very handy to have both setup :)
 
Here is the slotting jig, its made from some corian sink cut-outs I got from a counter guy. Its really simple, the sides are nice and square and can slide for blade kerf adjustment. I just clamped a piece of corian to the saw for a depth stop as well as stiffen the blade. There is an index pin to use with a stew-mac slotting template, the fingerboard gets double sided taped to the template and the the template indexes to the pin. I added a carriage bolt as a hold down clamp to make sure it stays in place while sawing.
 

Attachments

  • IMG_1098.jpg
    IMG_1098.jpg
    39.1 KB · Views: 15
  • IMG_1097.jpg
    IMG_1097.jpg
    41.3 KB · Views: 15
  • IMG_1096.jpg
    IMG_1096.jpg
    45 KB · Views: 14
  • IMG_1095.jpg
    IMG_1095.jpg
    44.6 KB · Views: 15
  • IMG_1093.jpg
    IMG_1093.jpg
    54.5 KB · Views: 16
Heres some more
 

Attachments

  • IMG_1328.jpg
    IMG_1328.jpg
    65.9 KB · Views: 14
  • IMG_1327.jpg
    IMG_1327.jpg
    52.5 KB · Views: 14
  • IMG_1326.jpg
    IMG_1326.jpg
    47 KB · Views: 13
  • IMG_1325.jpg
    IMG_1325.jpg
    69.1 KB · Views: 12
  • IMG_1324.jpg
    IMG_1324.jpg
    58.4 KB · Views: 11
  • IMG_1323.jpg
    IMG_1323.jpg
    55.9 KB · Views: 10
  • IMG_1322.jpg
    IMG_1322.jpg
    51.9 KB · Views: 11
  • IMG_1321.jpg
    IMG_1321.jpg
    53 KB · Views: 10
  • IMG_1319.jpg
    IMG_1319.jpg
    63.1 KB · Views: 11
  • IMG_1318.jpg
    IMG_1318.jpg
    103.3 KB · Views: 13
Here is the slotting jig, its made from some corian sink cut-outs I got from a counter guy. Its really simple, the sides are nice and square and can slide for blade kerf adjustment. I just clamped a piece of corian to the saw for a depth stop as well as stiffen the blade. There is an index pin to use with a stew-mac slotting template, the fingerboard gets double sided taped to the template and the the template indexes to the pin. I added a carriage bolt as a hold down clamp to make sure it stays in place while sawing.

Thanks for taking the time to show us your slotting jig, Dave. It looks like it gets the job done and won't be too hard to assemble. I'm really impressed with this bass build. Thanks again for taking us along.:thumb::thumb:
 
Heres some more, the bass is actually finished but it seems that while Im working on these type of builds I'm always too preoccupied to sit and upload pics.
 

Attachments

  • IMG_1342.jpg
    IMG_1342.jpg
    61.2 KB · Views: 12
  • IMG_1357.jpg
    IMG_1357.jpg
    75.4 KB · Views: 10
  • IMG_1358.jpg
    IMG_1358.jpg
    60 KB · Views: 11
  • IMG_1359.jpg
    IMG_1359.jpg
    67.4 KB · Views: 15
  • IMG_1341.jpg
    IMG_1341.jpg
    43.1 KB · Views: 9
  • IMG_1337.jpg
    IMG_1337.jpg
    49.8 KB · Views: 9
  • IMG_1336.jpg
    IMG_1336.jpg
    65.1 KB · Views: 12
  • IMG_1331.jpg
    IMG_1331.jpg
    61.1 KB · Views: 10
  • IMG_1330.jpg
    IMG_1330.jpg
    51 KB · Views: 11
  • IMG_1329.jpg
    IMG_1329.jpg
    46.2 KB · Views: 12
Close to done at this point. I made my own knobs, I'm not sure what species they are exactly, I got the blank out of a miscellaneous bin at the wood store. I have found out that its not the easiest thing to turn a bunch of things and have them come out the same way. The knobs ended up being too tall so they all went back on the lathe and got shortened and in that process with more accurate measuring they came out much more the same. While waiting for the target em6000 to cure I built a custom case, I tried a variation to the foam process that I used in the past. The first 2 cases I built I used styrofoam sheets and cut out the shape but with the price of styrofoam sheets and the amount of waste I wasn't happy with that. The 3rd case I used great stuff foam but with out the "supports" which didn't work all that well, the foam fell in towards the middle and had large bubbles, with the supports the foam is confined and fills better, I think that it also works better doing a few layers rather than 1 deep layer.
 

Attachments

  • IMG_1374.jpg
    IMG_1374.jpg
    83.6 KB · Views: 15
  • IMG_1373.jpg
    IMG_1373.jpg
    80.7 KB · Views: 13
  • IMG_1372.jpg
    IMG_1372.jpg
    83.2 KB · Views: 14
  • IMG_1371.jpg
    IMG_1371.jpg
    75.7 KB · Views: 18
  • IMG_1367.jpg
    IMG_1367.jpg
    48 KB · Views: 17
  • IMG_1366.jpg
    IMG_1366.jpg
    57.4 KB · Views: 16
  • IMG_1365.jpg
    IMG_1365.jpg
    70 KB · Views: 15
  • IMG_1364.jpg
    IMG_1364.jpg
    71.8 KB · Views: 16
  • IMG_1361.jpg
    IMG_1361.jpg
    61.4 KB · Views: 16
  • IMG_1348.jpg
    IMG_1348.jpg
    82 KB · Views: 14
I really like the sculpting at the neck/body joint, as well as at the butt of the body. :clap:

What are the five knobs? Volume, volume, tone, tone, master volume?
 
Volume, pickup blend, bass, mid with push pull switch to select freqency, treble and a toggle to bypass the preamp which is a Aguilar obp3, which I highly recommend.
 
Heres the finished product.
 

Attachments

  • IMG_1087.jpg
    IMG_1087.jpg
    61.2 KB · Views: 20
  • IMG_1085.jpg
    IMG_1085.jpg
    51.9 KB · Views: 19
  • IMG_1084.jpg
    IMG_1084.jpg
    32.6 KB · Views: 18
  • IMG_1079.jpg
    IMG_1079.jpg
    37.8 KB · Views: 19
  • IMG_1078.jpg
    IMG_1078.jpg
    40.5 KB · Views: 18
  • IMG_1076.jpg
    IMG_1076.jpg
    48.2 KB · Views: 20
  • IMG_1075.jpg
    IMG_1075.jpg
    44.9 KB · Views: 20
  • IMG_1074.jpg
    IMG_1074.jpg
    80.6 KB · Views: 20
  • IMG_1073.jpg
    IMG_1073.jpg
    69.7 KB · Views: 22
  • IMG_1091.jpg
    IMG_1091.jpg
    60.1 KB · Views: 21
Did you do another thread on a case like that before? Love the bass, the case really makes a nice protective environment.
 
Top