My CNC Build - Update

Aha!

So you import the native SketchUp file into SketchUcam on another machine. Now I am wondering if I were to draw a SketchUp file on my Mac, export the native file via flash drive to a PC that creates the gcode and then controls the CNC....

Interesting. So much to think about, to consider, and to contemplate. Can you also take a bitmap picture to gcode, etc.? I'd like to get into this in an orderly fashion without breaking the bank. So I am trying to understand my various options. Thanks for the help. Wish I had a reason to visit the east coast. I'd have to find a way to invite myself to your shop!
 
SketchUCAM is a plugin for sketchup - it might run on your mac and you can go straight from mac to gcode.

I spent several hours with it and it can be made to work though it's limited. It's not bad for free, but there are better free methods available for 2D. Inkscape and FEngrave can get you some pretty decent 2D modelling and toolpaths, respectively. Worth a look.
 
I've worked with Inkscape, MakerCAM and UGS as a sequence to get a drawing to CNC. It works, but I'm not too enthusiastic about Inkscape since I'm fairly fluent in SketchUp.

Inkscape can import a bitmap and create vectors, but it's not very pure from my experience. More practice needed there. You still have to create toolpaths in a CAM program.

I've done text V-carving and some engraving with F-Engrave and it's good for what it does. I'll want something with more capability soon.

I plan to use the SketchUp/SketchUcam path as much as possible until I'm ready to spend more.
 
It's an age one issue.

I like this one better - you like that one better.

This one is free - but that one is too.

I like Vectric you like Artcam.

I like Autocad - you like CadKey

I like Red you like blue

Chevy vs Ford

At the end of the day - they are all the same.

Beauty is in the eye of the beholder.

Do what you are comfortable with - use what you like to use.

There really is no right - or - wrong way.

I find 10 programmers will program 10 different way - but the end result will be the same.
 
Update: 04/20/2015

In amongst more outdoor projects and resting these old bones from said projects, I've tested some different things on my CNC. One thing I had tried to cut was a fairly simple bracket to hold the spindle more securely than the "universal" bracket supplied with the S2. When I finally bought more bits and got the right type, it became much easier to make decent cuts. I had seen several versions of brackets made from HDPE and wanted to go that route myself.

Below is what the "universal" brackets in the S2 kit look like. It's serviceable and made to work with Dremel tools as well as spindles, but...

View attachment 90141


Here's what I drew up in SketchUp:

View attachment 90142


Here's a comparison of the old vs new:

View attachment 90143


Here's the new set of brackets in place doing their job - quite well, I might add. I made the small hole about 1 1/16" diameter to hold a piece of pvc over which I can slide a 1.25" shop vac hose. I need to pick up a 45° elbow to complete the bottom of the vacuum line.

View attachment 90144View attachment 90145


Now, if I can only stop experimenting and actually make something!!!

Now that's some nice work Bill.
Garry
 
Update: 04/22/2015

A little more fabricating. No, not THAT kind!

Since I built my S2 with an X axis longer than normal, I decided to update to 9mm belts in place of the standard 6mm. Pulleys and idlers were readily available but nobody had any belt anchors. So, I set about laying out something in SketchUp. I also needed the right type of material and found some Lumasite on my shelf of scrap. The Lumasite I have is 1/8"; it's acrylic with embedded fiberglass that looks like rice paper. I got everything set up, then the fun began!

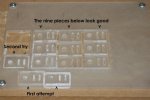
I had to use a 1/16" end mill due to the size of slots required - about 3/32" wide. Here's what happened along the way:

CNC_Bld_0024a.jpg

The first pass seemed to be going OK, then the Y axis (gantry) motor missed a couple of steps creating the offset you see at the bottom of the photo. I checked the driver feeding Y and upped it a bit. When I restarted, things were moving along fine until the bit broke. Note to self: don't try running a 1/16" bit at 20ipm!! After a bit more thought, I changed the feed to 6ipm, zeroed things in and started another run, this time making it through all nine pieces I wanted to make.

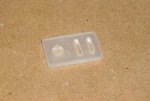
Here's the end result. I need six to do both sides of my X axis along with the Y axis. This is 27mm long by 17mm wide.

CNC_Bld_0024b.jpg


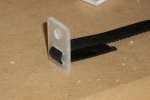
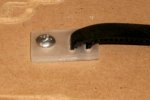
Below is how it all fits together, with the exception that it will be mounted on the ends of the makerslide when I get all the work finished.

CNC_Bld_0024c.jpgCNC_Bld_0024d.jpg


Thanks for looking!

Next time, I'll show you a bit of experimenting on the fun side!
 
Looks like it does a decent job cutting things out. How many oz/in are your x and y motors? I know they were nema 23's but couldn't remember how much torque they had.
 
Looks like it does a decent job cutting things out. How many oz/in are your x and y motors? I know they were nema 23's but couldn't remember how much torque they had.

I'm getting better cuts as I learn more about spindle rpm vs feed rate. Now that I look back at the closeup photo of one of the clips, I see I should have cleaned it up a little better!
The NEMA 23 motors are rated at 140oz/in. In my configuration, I have two on the X axis and one on Y.
 
I'm getting better cuts as I learn more about spindle rpm vs feed rate. Now that I look back at the closeup photo of one of the clips, I see I should have cleaned it up a little better!
The NEMA 23 motors are rated at 140oz/in. In my configuration, I have two on the X axis and one on Y.

I haven't looked really closely at that controller, are they running bipolar or unipolar? I think bipolar keeps the motors close to their spec, but unipolar lowers the amount of torque they actually produce.
 
I haven't looked really closely at that controller, are they running bipolar or unipolar? I think bipolar keeps the motors close to their spec, but unipolar lowers the amount of torque they actually produce.

It's bipolar. The controller is at the top end of its range for these motors but so far, so good. I need to add more cooling to keep the chips from being damaged.
 
Top