Wood Hinge Boxes

Ted Calver

Moderator
Staff member
Messages
8,468
Location
Yorktown, Virginia
I've been playing with the new iBox and wood hinge jigs and these are the first products. I'm a bit concerned about the cross grain glue job on the hinges and wonder if they will hold up. They are essentially cigar boxes with fancy lids, but the wife likes them and has claimed first dibs. I'm experimenting with finishes and haven't found one I really like yet. The sides are made from Brazilian koa flooring cut offs that were planed down to 3/8" thickness for use as CBG finger boards, but which ended up being too short. Tops are 3/8" thick and overlap the bottom on three sides to facilitate opening (with arthritic fingers). The bottoms are all 3/16 prefinished plywood, floating in a groove. I'm not real happy with the floating plywood bottom. It would be nice if the bottom was as nice as the top, but I'm not sure how to go about it and not violate the wood movement rules. Anybody glue their box bottoms? I used Titebond II for the glue ups. The inside sides of the boxes haven't been finished. I'm thinking shellac, or maybe just wax. Thanks for looking.

This one is roughly 9.5" x 11' x 3' with a spalted sweetgum top and 3/8" padouk hinges. Finish is two coats of Minwax Antique Oil.
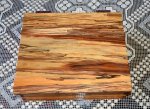
DSC_5322C.jpgDSC_5325CC.jpg
This one is roughly 6" x 13" x 3" with a spalted silver maple top and 3/8" padouk hinges . Finish is four coats of Waterlox Original and I'm waiting a while before I rub it out to get rid of the dust nibs.
DSC_5305.jpgDSC_5317.jpg


This one is 6.5" x 8" x 3" with a spalted silver maple top and 3/8" cherry hinges. Finish is two coats of Watco Danish Oil (natural).
DSC_5331C.jpgDSC_5334.jpg
This one is 6.75" x 16" x 3" with a spalted silver maple top and 3/8" padouk hinges. Finish is three coats ofWatco Danish Oil (natural). This box tried to self destruct a couple of times. My clamps slipped when I was routing the hinge slot on the inside, so there is a boo boo patch, and I accidentally dropped it when I was finishing it and broke a hinge. I was able to use the heat gun to soften the glue and then replaced the hinge.
DSC_5342.jpgDSC_5343.jpg
 
Last edited:
Holy Crow Ted, those look amazing. I cannot pick a favorite.:score:Oh boy you got some nice lids there. That spalted silver maple is unbelievable.:thumb:


I like the wooden hinges , but in the spirit of offering a personal constructive opinion, i would have liked to see them longer for aesthetic reasons. Then I know the lids are made from fancy wood and that punky spalted wood may not make the best hinges but given what guys do with stabilizing, it would have been super wow to see the hinges match the lid material, (at least half ) so they less intrusive in the image of the underside of the lid when open , but that's a huge ask and expectation.

However i am sure anyone receiving one of these boxes would not even think of what i have mentioned.

The lids sure steal the show though, the rest of the box kinda does not get a show in. :)
 
....I like the wooden hinges , but in the spirit of offering a personal constructive opinion, i would have liked to see them longer for aesthetic reasons. Then I know the lids are made from fancy wood and that punky spalted wood may not make the best hinges but given what guys do with stabilizing, it would have been super wow to see the hinges match the lid material, (at least half ) so they less intrusive in the image of the underside of the lid when open....

I felt the same way, Rob. This was the first batch and I was following the instructions to use only straight grained, non-curly wood. I think I can use the spalted stuff for hinges if I soak it in thin CA glue first. Those little 3/8" hinges are kind of fragile.
 
When I used to make a lot of boxes I made a few with wooden hinges using plans from the Incra gauge. I have never had one fail even though they all were attached in a cross-grain fashion. I always used complementary but different wood for those hinges because I wanted to celebrate the wooden hinge itself. For me, the only one, where the hinges are just too different, is the third one in spalted silver maple and cherry. The cherry is not complementary to my eye.

I always used plywood for the bottoms of my boxes, either 1/8" birch plywood for smaller boxes or 1/4" lauan for larger boxes. Everyone tells you not to glue in the bottoms, but I always did on the sides, front and back since they were always constructed with long grain materials running along their length. Never had an issue and some of those boxes are now more than 25 years old.

Usually, I lined the bottom of my boxes with some kind of plush velour, ultra suede or other fabric suitable for jewelry boxes. This is easy to do by cutting a piece of thin cardboard from a gift box to size where it is about 1/8" or so less in length and width than the inside of the box. Then just wrap it with the fabric by mitering the corners and glue the fabric folded onto the underside of the cardboard with double stick tape. On a few occasions, I veneered the plywood for the bottom with some beautiful veneer, usually a burl if it was supposed to be a man's box.

I am envious that you were able to find such wonderful wood for lid panels. Your boxes are just wonderful.
 
Those all look great Ted. What a fun and very personal set of boxes. The absence of metal hardware really focuses the attention on the figured tops.
 
Those boxes are great as it is the wood choice. Congratulations Ted!
Unfortunately I can't find spalted wood here. I try to obtain salvaged logs but no results so far, either they are completely rotten or they are of a non suitable wood.

While I do like wood hinges, I think that in these specific boxes they do not enhance them but somewhat damage the whole appearance. In such boxes I would have done the kind of hinge that Rob Cosman makes, but this is only my opinion.
 
Thanks everyone for the thoughtful comments, observations and suggestions. Toni's mention of Rob Cosman led me to his site and interesting wood hinge. I couldn't quite figure out how Rob was making the hinges and didn't want to buy a CD, but Google found me several leads on the technique, apparently used to make old time English tea caddies, and some tutorials on another site. Along the way I found a suggestion on cutting box miters using a 45 degree chamfering bit on the router table that I want to try, since my attempts at mitered boxes on the table saw usually require a lot of fiddling. They were even mitering in the top and bottoms. I guess that these boxes are so small that the glue is stronger than the wood so movement isn't such an issue. I'll try gluing in some bottoms.
 
Top