
glenn bradley
Member
- Messages
- 11,551
- Location
- SoCal
Long ago and far away I posted a thread on my "next" workbench. I called it that because I knew it wasn't my last workbench. This one isn't the last one either (I don't think) but, I have learned enough in the last few years to make a significant stride toward the bench that I may eventually make as my "final" workbench.
This build will go in a couple of phases as I have some things going this month. I figure many of you will be at the gathering at Jonathan's so a break in the action won't hurt.
A workbench is a fairly personal thing. Despite all the books (there are some really good one out there) about workbenches, no one can really tell you, or me, what will work best for them. It is a learning process as, when it comes to this craft, we sometimes end up far from where we thought we might. So here is my third step in the evolution of what works for me. Perhaps some of the ideas will work for others or spark ideas to ponder while designing your own.
Things I will keep:
Things I will change:
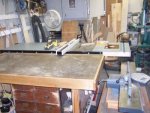
Well, enough yapping . . . let's see some work. Here's is the current bench. He's been great but, his days are numbered. He already has a new home to go to where I know he will be appreciated.
.jpg")
I toss some foam board on the floor and rough out the four layers of material for the top
.jpg")
I rip the top layer to width and use my larger sled to cross cut it.
.jpg") .
. .jpg")
I have a strip of wood with a couple of recessed bolts/oval nuts in it that I lock into the miter slot of the router table. This helps to support longer stock.
.jpg") .
. .jpg")
The second layer is oversized by about 1/4" each way. I use screws and weights to "clamp" this to the finished-sized layer. The screws are later removed (something I failed to do in my last top). The green tape you see in the lower right corner of the picture with the weights is a shim to assure that the finished-sized layer is dead flat.
.jpg")
cont'd
This build will go in a couple of phases as I have some things going this month. I figure many of you will be at the gathering at Jonathan's so a break in the action won't hurt.
A workbench is a fairly personal thing. Despite all the books (there are some really good one out there) about workbenches, no one can really tell you, or me, what will work best for them. It is a learning process as, when it comes to this craft, we sometimes end up far from where we thought we might. So here is my third step in the evolution of what works for me. Perhaps some of the ideas will work for others or spark ideas to ponder while designing your own.
Things I will keep:
- The MDF work surface
- the current MDF top has taken incredible abuse and still looks great.
- It was treated with BLO and then paste waxed with the wax getting renewed every year or so.
- Any serious dings can be filled with epoxy and the dog holes have held up without fail.
- A laminated sheet goods top
- the current top is all MDF, I want to use less support in the base structure so I will use a combination of BB ply and MDF
- two laminated sections of 3/4" BB ply for support and strength
- two laminated sections of MDF for the balance
- Drawers
- I like having drawers under the bench.
- The current drawer unit will get reused.
Things I will change:
- The front vise will be a twin screw.
- The tail vise is to be determined but, I will build for another twin screw.
- Wonder pups and so forth will suffice at the tail for now.
- The height will be about 2" shorter.
- This will make hand tool work more comfortable.
- My bench-on-bench will take care of any elevated work.
- The size will reduce from about 30" x 88" to about 27" x 74".
- My new outfeed/assembly table allows me to reduce the main bench size and get some sorely needed breathing room.
Well, enough yapping . . . let's see some work. Here's is the current bench. He's been great but, his days are numbered. He already has a new home to go to where I know he will be appreciated.
I toss some foam board on the floor and rough out the four layers of material for the top
I rip the top layer to width and use my larger sled to cross cut it.
. I have a strip of wood with a couple of recessed bolts/oval nuts in it that I lock into the miter slot of the router table. This helps to support longer stock.
. The second layer is oversized by about 1/4" each way. I use screws and weights to "clamp" this to the finished-sized layer. The screws are later removed (something I failed to do in my last top). The green tape you see in the lower right corner of the picture with the weights is a shim to assure that the finished-sized layer is dead flat.
cont'd
Last edited:
.jpg")
.jpg")
 .
..jpg")
.jpg")
.jpg")
.jpg")
.jpg")
.jpg")
.jpg")
.jpg")
.jpg")
.jpg")


.jpg")


.jpg")
.jpg")
.jpg")
 .
. .jpg")
.jpg")
.jpg")
.jpg")
.jpg")