
allen levine
Member
- Messages
- 12,369
- Location
- new york city burbs
I just winged it, no real plans, just looked at pictures online, and estimated, drew it out as I went along.
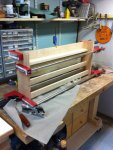
And after initial clamping, I realized too many design flaws.
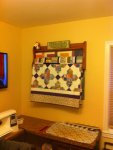
the main one is that I didn't leave enough room between the quilt hangers to show off more of the quilts, Im thinking I should have made it 6 inches, instead of 2 inches.and the side walls should have had more length so I could have shaped the bottom instead of leaving it flat. live and learn, its a process for me. different once I cut things, the way I saw it in my head.
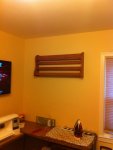
in my defense, I was trying to fit this rack on a wall where there isn't much length since there is a tabletop underneath it.
Instead of starting over, Im going to finish this one, worst scenario, only put 2 quilts on it.
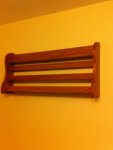
All cherry, will be stained and sprayed.Maybe not stained)
all mortise and tenon joinery, some had to be fine tuned by hand.
I will shape the walls a bit.
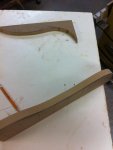
I used some round and oval pieces of plastic to form a shape. Then carefully with fluid motion ran the shape thru the bandsaw to avoid a lot of stop and go cut marks.
I then used 220 grit and really hand sanded out any bumps/blade marks on the template. Tedious, but I wanted it smooth so I can run a router bit over it without any bumps.
heres where Im at, Im already thinking about the next 3 or 4 quilt hanger and correcting some of the design.(maybe a wider top on the back top section so I can cut some pattern/curves on it.)
first one, worth finishing, its only 3 feet wide because again, limited wall space.Next one for back room I might go as wide as 44-48 inches.
after shaping side walls, all pieces will be rounded over.
And after initial clamping, I realized too many design flaws.
the main one is that I didn't leave enough room between the quilt hangers to show off more of the quilts, Im thinking I should have made it 6 inches, instead of 2 inches.and the side walls should have had more length so I could have shaped the bottom instead of leaving it flat. live and learn, its a process for me. different once I cut things, the way I saw it in my head.
in my defense, I was trying to fit this rack on a wall where there isn't much length since there is a tabletop underneath it.
Instead of starting over, Im going to finish this one, worst scenario, only put 2 quilts on it.
All cherry, will be stained and sprayed.Maybe not stained)
all mortise and tenon joinery, some had to be fine tuned by hand.
I will shape the walls a bit.
I used some round and oval pieces of plastic to form a shape. Then carefully with fluid motion ran the shape thru the bandsaw to avoid a lot of stop and go cut marks.
I then used 220 grit and really hand sanded out any bumps/blade marks on the template. Tedious, but I wanted it smooth so I can run a router bit over it without any bumps.
heres where Im at, Im already thinking about the next 3 or 4 quilt hanger and correcting some of the design.(maybe a wider top on the back top section so I can cut some pattern/curves on it.)
first one, worth finishing, its only 3 feet wide because again, limited wall space.Next one for back room I might go as wide as 44-48 inches.
after shaping side walls, all pieces will be rounded over.
Attachments


Last edited:


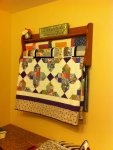
") Elen's quilts look great also
Elen's quilts look great also