
- Messages
- 11,636
- Location
- Constantine, MI

Great to see the shop finally within reach!
")
Looking good! I should consider one of these, really get a lot of moisture when running the blasting cabinet. I did finally install one of the automatic drain kits and seems to work well for keeping the tank drained...
...How long are your vertical pieces?
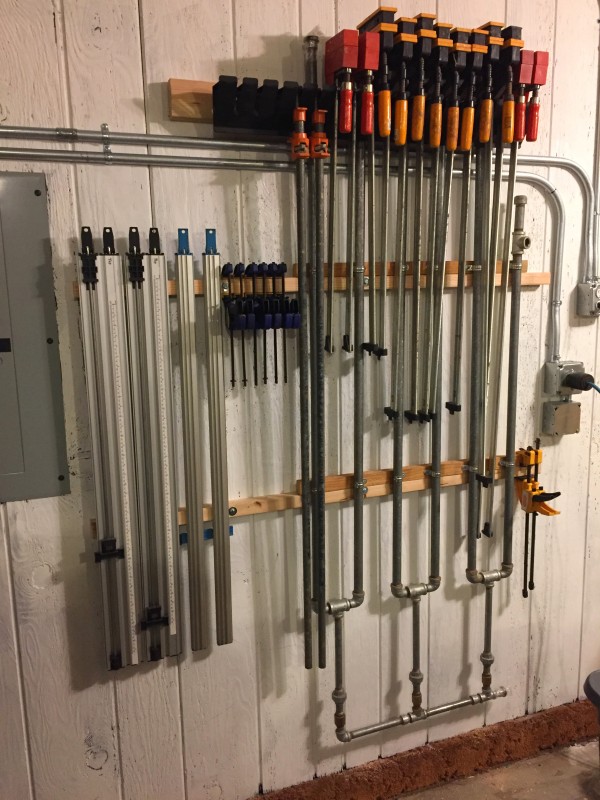
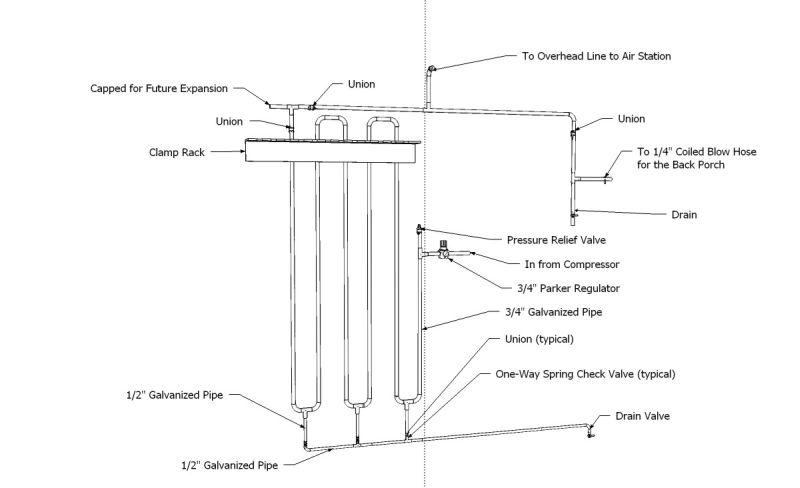
I'm planning to run the three drops straight into the horizontal run and route it through the back wall of my shop to a spring valve so it will dump outside.
... Assuming I'm understanding your description, I started out thinking along the same lines as you, with a single valve and no check valves. Then I realized that without the check valves, the air would simply bypass the loops and go down the first vertical, across the horizontal collector tube, then back up the last vertical run to the outlet. Shortest distance ans path of least resistance.
...I've got about 100' of Pex left over from my water line replacement that I was considering running drops with. It's supposed to be good for up to 150# of pressure and doesn't burst like pvc. My tank shuts off at 120#, the only concern is UV light making the Pex brittle, but I've read of others painting it with interior house paint to protect it.
... I checked my supplies and found the five (5) check valves I bought for this project. So, I guess I'm set.
... Can you imagine the projects we could all build with the parts we've bought and forgotten about?
Two tanks is a really good idea, I may need to try this. It's rare I need a tank full of air, mostly with the blast cabinet. I'll most likely do copper at the start and at the drops, pex between them.You apparently know about PVC and compressed air. I saw a shop where they put PVC inside the walls, and one morning they came in with a huge hole in the sheetrock. Fortunately they had shut the compressor down over the weekend, even though they had not released the pressure.
If I get a big compressor, I would build it with two tanks... the giant tank that usually comes with a big compressor, and a small, perhaps 5 gallon, tank. I would put a valve on the big tank, so I could run the compressor for small jobs (just a few nails, for example) without taking the time and energy to fill the big tank, but open the ball valve to incorporate the big tank when it would be useful. With this system it would be easy to depressurize the distribution lines, at which point I would worry less about PVC or PEX - everything ahead of the main cutoff would be copper.
... If I get a big compressor, I would build it with two tanks... the giant tank that usually comes with a big compressor, and a small, perhaps 5 gallon, tank. I would put a valve on the big tank, so I could run the compressor for small jobs (just a few nails, for example) without taking the time and energy to fill the big tank, but open the ball valve to incorporate the big tank when it would be useful. With this system it would be easy to depressurize the distribution lines, at which point I would worry less about PVC or PEX - everything ahead of the main cutoff would be copper.