I Made A Few More Tool Boxes Last Week

Charles Lent

Moderator
Staff member
Messages
789
Location
Central North Carolina
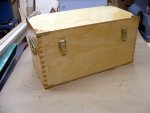
Last week I made these boxes to keep my scroll saw blades and small hand tools that I use when working on the scroll saw all together and better organized They are similar to other "dedicated use" custom tool boxes that I've made over the years to keep special tools and their accessory parts together in one place. The third box with the black handle was made to keep my Kyrmi Original Mini Fence jig and it's accessory parts together. This is kind of a box joint jig for making very small 1/8"and /16" box joints, but it isl also great for making decorative inlay strips. All three boxes were made from Baltic Birch plywood scraps left over from a large project. I used I/2" for the box sides box jointed at the corners, and 1/4" for the tops and bottoms. I cut the box joints using an Incra I-Box jig and a Freud SBOX* blade on my Unisaw. Who ever said that "You Can't Cut Box Joints In Plywood"? It's been easy for me.

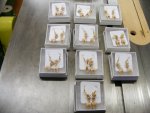
Box #1 photos 1 & 2 Is for keeping my scroll saw tools and frequently used blades together. I use 5 1/2" tall prescription pill bottles to keep my scroll saw blades organized, with a 1" round label attached to the caps to show what is inside each bottle. These bottles will hold about 3 gross of blades in bundles of I open one bundle at a time and just leave them loose in the same bottle. It's easy to slide one of the blades out with one finger when I need one. My pharmacist gives me unused bottles and caps whenever I ask for them. This box will travel with me and my scroll saw when I teach away from my shop or go to shows to do demonstrations.

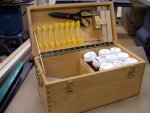
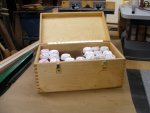
Box #2 photos 3 &4 Is a little larger than box 1, but Isn't quite complete inside, but already in use. It holds all of my less ofthe used scroll saw blades, again in prescription pill bottles. It will likely remain in my shop near where I scroll saw, but may travel to larger shows.

Box #3 photo 5 with the black handle is for the Mini Fence. It's assembled and the Mini Fence is already in it, but the box has no finish on it yet, nor has the inside been partitioned yet.

Photo 6 is a close-up of one of the box joints.

I hope you like them, but if you see anything to criticize, please do so. I l learn from them, to do betterthe next time, but keep in mind that these are "tool boxes" and not meant for sale.

Charley
 

Attachments

  • DSCF0538LoRes.jpg
    DSCF0538LoRes.jpg
    69.5 KB · Views: 55
  • DSCF0539LoRes.jpg
    DSCF0539LoRes.jpg
    83.3 KB · Views: 57
  • DSCF0540LoRes.jpg
    DSCF0540LoRes.jpg
    64.6 KB · Views: 54
  • DSCF0541LoRes.jpg
    DSCF0541LoRes.jpg
    72.8 KB · Views: 52
  • DSCF0543LoRes.jpg
    DSCF0543LoRes.jpg
    59.4 KB · Views: 51
  • DSCF0545LoRes.jpg
    DSCF0545LoRes.jpg
    67.7 KB · Views: 50
I like them, joints are good and tight and some smart storage ideas there for the blades! I need to make something very like this for lomls essential oil storage (she makes some soaps and similar they're used in).

What are the yellow ?spacers? for on box #1, I feel like I'm missing some trick there :) ?

I see a bit of finish run on the last picture, I suspect that this was full thickness poly? I've had some luck avoiding that by thinning the finish and going to doing more thin wipe on/wipe off coats. For a purely functional piece it matters less.
 
Ryan,

Those yellow things are preset angle gauges for setting the scroll saw table angle to the blade accurately. Each "wing" is tilted 0.5 degree more than the other end or the one to the left of it.. Two different angles are on each one, so there are many increments of 0.5 degree available in the set. The base of these is under a slotted board that holds them in place in the box, so you can't see the full piece, but you choose the one of these with the wing angle that you want and then set the base of it on the scroll saw table, then use it much like a small square, but angled. To adjust the table or blade tilt precisely. Actually in the box on the side of the box partition is a piece of Plexi with a protractor screen painted on the side of it for doing the same angle adjustment that I use whenever I can't use the yellow gauges.

Also in the lid are a pair of scissors to trim patterns before gluing to the blanks, and special shop made clamps for compound cutting reindee, ornaments and other 3D patterns. In the bottom left side of the box I keep a truckers convex mirror to make it easier to thread the blade when doing fret work, pens, pencils, rubber cement, fingernalil sanding sticks ( great for de-fuzzing) edges, small wrenches for working on the scroll saw, some 1/8 and 1/16 X 5" dowels that are pencil sharpened on both ends (used for holding down loose pattern pieces and for pushing small scraps out of cut patterns), etc. They are all loose in this side with nothing to hold them in an exact place.

Some previously made boxes of the same design were for mu I-Box jig and my CRB-7 router jig and all of it's loose accessory pieces. I think that I may have already posted these, but I don't remember for sure. If not already posted on this site, and someone wants to see them, please send me a PM and I will post them. The CRB-7 box was quite a challenge to get everything to fit together well, and ended up being three layers deep in the bottom and 2 layers deep in the lid. Outside, it looks just like one of these, although stained a light cherry and smaller in size.

I make a lot of boxes.


Frank, Thanks for the comment.

Charley
 
Last edited:
Thanks for the more details, some really great ideas in there :thumb: The angle gauges could be pretty handy alright. The convex mirror trick is genius... that could certainly be handy in all sorts of awkward places around the shop.

Do you use the rubber cement for pattern to blank adhesion mostly? For carving I've moved to mostly 3M 77 because the pattern peals off a bit easier but haven't been perfectly happy with the left behind residue (only applying it to the pattern helped.. some).

Ryan,

Most of what I cut out are compound cuts (3D work). When you do these, there is no need to remove the pattern. It all comes off, still attached, to the scrap, so I find that Stationery Store plain old rubber cement works very well for these as I never need to remove the paper patterns.

The convex mirror that works the best for me is sort of rectangular with rounded corners about 1" X 2 1/2" and mounted to an angled plastic base. It's more intended to stick onto the lower part of a car side mirror. I also have a 3 1/2" round mirror with a crimped on metal back that is intended more for longer truckers mirrors. Both of these fell off of mirrors on my previous vehicles and since made it into my scroll saw tools. Their peel and stick backing is long gone. I also have no idea where I bought them. It was probably 40 years or more ago.

I've seen the yellow plastic angle gauges for sale recently. I think it was www.prteeusa, but not certain. I have a friend looking for a plastic protractor like mine, but I can't remember where I got it either, and have never seen them for sale anywhere since I bought it.

Attached are some photos of some of my compound cutting work. I've been making larger reindeer 3 1/2" tall (same image) and giving them away at Christmas for 12 years now. I've made well over 3,000 of them. The ear ring reindeer were made a few times before, but I made 47 pair of them for this past Christmas Season. I've made a few hundred ornaments over the years too, but photos of them don't seem to be on this computer. Well, the reindeer should suffice to give you an idea of what I do. I've already started making the larger reindeer and other things for next year's Christmas Season. I don't sell and never have, but I'm seriously considering it this year. I may also start posting training type videos on YouTube. (maybe).


Charley
 

Attachments

  • DSCF0507.jpg
    DSCF0507.jpg
    47.8 KB · Views: 19
  • DSCF0510.jpg
    DSCF0510.jpg
    58.6 KB · Views: 17
Last edited:
Ah, yes where the outside is all cut away for those projects it wouldn't matter. I remember you posted those earings (or ones very like them) before, but glad to see them again, they are really fantastic. :thumb:

Thanks for the hints on the mirrors as well - I suspect I'll be able to find something about right come estate sale season :)

I've also learned (literally today) that Naptha removes 3m 77 :doh:
 
And DNA removes pencil lines, if you don't dent the wood while making the the pencil mark

You should be able to find convex mirrors in the auto parts stores or Walmart year round. I think the demand for them may be a little less, now that some auto makers are making the side mirrors with slightly convex shapes to them.. Truck stop accessory areas are another place to check. Only a couple of buck if I remember right.

Here's a shot of a dis-assembled reindeer shell after I finish "hatching" a reindeer. He comes out of the shell without any paper attached to him. It's one of the side benefits of compound cutting.

Charley
 

Attachments

  • DSCF0500.jpg
    DSCF0500.jpg
    67.2 KB · Views: 12
Last edited:
Top