Box joint glue-up, vertical surfaces only?

Darren Wright

Administrator
Staff member
Messages
20,157
Location
Springfield, Missouri
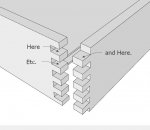
I was watching DiResta's build of a tool cabinet and noticed his glue-up of the box joints only looked like he glued the vertical mating surfaces, not the fingers themselves. I'll admit, it makes for a fast assembly the way he shows (at 2:38 or so), but question the bond of the joints only being glued on 2 surfaces.

He does his videos in fast motion, so maybe he left out the glue-up of the fingers. Just curious if anyone else does them this way and how the joints hold up?

https://youtu.be/0wGAyzHRlfQ?t=159
 
Man that's really hard to catch in that video. But interesting.

Maybe he's assuming the squeeze out will help?
 
Man that's really hard to catch in that video. But interesting.

Maybe he's assuming the squeeze out will help?

Yeah tried to post it at he time, but the it doesn't start there in the embedded video.

I think for the kind of weight he's putting in the box, I'd want it a bit stronger, but maybe it works just fine.
 
I do the top surface of every finger so, the horizontal surface in the shown orientation.

Box Joint Glue.JPG

Picked that up in a book somewhere.

Plane Till (60).jpg

Never had a failure.
 
Last edited:
I've just edge glued plywood dados and had them hold up for ~years. I don't think this would be substantially different. For solid wood like Glenn shows would be required because of the end grain.

Also squeeze out much :eek: I'm sloppy with the glue sometimes but wow :eek:
 
Jimmy tends to work as fast as he can, then speed up his videos anyway. If he can get away with putting less glue in his joints, he will. I would rather take the time to put the glue on all mating surfaces and be certain that it will hold together. For me, it only takes a few minutes longer, and time isn't as important for me. I watch a lot of his videos, and I think that I may have met him once, a very long time ago. He is from Brooklyn and I came from about 25 miles North of there, so we may have. I like his videos, but not necessarily the way that he does many things.

Charley
 
I think Glenn has the answer for solid wood - the end grain part is near useless to glue, and the glue on the top of the fingers will wipe plenty on the bottom of the connecting fingers.

When it comes to plywood I did an experiment a couple times... putting glue only on one side of the plywood, or only on the hardwood being attached to the edge of the plywood. After I had it squeezed together (clamped) but fast, before it dried, I pulled the joints apart. I was amazed at how little of the plywood had glue from the mate piece. Therefore when plywood is involved, I work it into both surfaces before clamping the joints.
 
Obviously HMMV, but I wouldn’t do it that way. I’ve glued box joints but not ones that long. I’d have used liquid hide glue for the open time and glued every surface I could get to.
 
I agree, but I use Titebond Extend glue on big glue-ups, especially box joints, and Titebond II for most everything else. I don't really care for the liquid hyde glue, I but have used the hot version made from flakes for repairing antiques. I use a temperature controlled bably bottle warmer to heat small amounts of hyde glue flakes whenever using it for repairsand only small amounts are needed. The baby bottle warmer works quite well for this. I put the glue flakes into a small metal can that fits inside the warmer and then add just enough water around the can inside the warmer to make it heat evenly. The repairable traits of the hyde glue are nice, but I like something more permanent for my newly made projects. When gluing box joints glue goes on every mating surface. I use blue tape to keep the glue from going beyond the joint, especially inside, so it's easier to remove before it hardens. Most of the time it all lifts off with the tape, if you don't let it get rock hard before pulling the tape off. More an more I find myself using blue tape on any glue joint to keep the glue from going beyond the joint and it works quite well.

Charley
 
Charles you're a font of great ideas.

The baby warmer would be a lot more consistent than the mini crock pot I've been using. It has an unfortunate tendency for the heat to surge and wane a bit more than I like (although isolating the jar with the glue from the bottom of it with an old canning jar ring helped).
 
Ryan,

I bought the baby bottle warmer at the local thrift store. I think I paid $2 for it. They had several on the shelf, so I just took the cleanest looking one. I've used it occasionally for about 5 years now and it has done a fine job, although a bit small for any serious gluing chores. A temperature setting of about mid way on it's dial has been just about perfect for the glue,

Charley
 
I bought the baby bottle warmer at the local thrift store...

I use an electric teapot (Rival brand, I think) that I bought at WalMart for about $6.95. At the lowest setting, mine holds 140°F pretty steadily. It has a plastic shell and lid, and I cut a hole in the lid so that I can just set a small jelly jar in it, and directly dispense the glue from the pot. I've been using it that way for over ten years, with good results. BTW, when I use the 'Old Brown Glue' (which I keep refrigerated) I use the pot to bring it up to usable temp, too.
 
It can be slow and boring to apply glue to all the important surfaces. What works best for me is to cut a foam brush with a pair of scissors into a crenellated shape that matches the box joint. Dipping the brush into glue and making a quick swipe from the inside of the box gets all the relevant surfaces of several fingers at once, without getting glue where it's not wanted. It's fast enough I can use titebond 1.
 
BTW, when I use the 'Old Brown Glue' (which I keep refrigerated)

Sometimes I wonder why I don't think of the obvious. Thanks for the tip. Now if I can just find room and not confuse it with something more edible. I once made a peanut butter and "jelly" sandwich when the wife was away. Only problem is I made it from a "jelly" jar in refrigerator that my wife was using to store barbecue sauce (she recycles everything). When my wife got home and after eating the entire sandwich I kind of complained about the jelly being kind of strange. I still think she could have been a little more sympathetic and not laugh so hard.

I use the pot to bring it up to usable temp, too.

I do the same as it congeals in the low temps of my shop, but must confess when in a hurry I have zapped it in the microwave for a few seconds to get it flowing. Still not sure that it is a good idea, but so far no failures.
 
...I once made a peanut butter and "jelly" sandwich when the wife was away. Only problem is I made it from a "jelly" jar in refrigerator that my wife was using to store barbecue sauce (she recycles everything). When my wife got home and after eating the entire sandwich I kind of complained about the jelly being kind of strange. I still think she could have been a little more sympathetic and not laugh so hard.

:rofl: :rofl: :rofl: [cough - cough - snerk]

For some reason that just reminds me of the time my dad brushed his teeth with Brylcreem. :D
 
... must confess when in a hurry I have zapped it in the microwave for a few seconds to get it flowing. Still not sure that it is a good idea, but so far no failures.

The reason for not doing that is that the microwave heats unevenly so you can be over heating some parts of the glue but underheating other parts. You can mostly mitigate this by using low power and shorter heat times with some rests between each round (so like six 10s heating cycles on low power with a 10-15s wait between each instead of a single 30s cycle at high power).

How much difference that all makes in the real world I don't know.
 
Top