Dust Deputy, Shop Vac Mod - Version 2

glenn bradley

Member
Messages
11,558
Location
SoCal
This is an additional but, redesigned version of this prototype from some years back. I should probably mention that I get a kick out of building this sort of thing out old, cast off IKEA furniture.

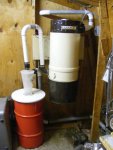
Another small to-do I have been meaning to get to since . . . . well, its been a couple of YEARS since I bought this Ridgid vac at a Home Depot Black Friday sale!?!

DD-Vac-V2 (1).jpg

I have one of these that I call version 1. It was made on-the-fly out of some real crummy particle board as a proto-type. It has worked fine and so still survives. I will move version 1 over to the drill press / small bandsaw area and version 2 will become the main shop vac / hand held power tool vacuum system.

Both version 1 and version 2 will use Ridgid’s vac that converts to a yard vac/blower. This just makes the conversion easier. The idea is to eliminate the massive barrel as when using the Dust Deputy, the barrel remains pretty much empty.

DD-Vac-V2 (2).jpg

I learned on version 1 that reinforcing the bucket lid is a good idea. Clogs or unexpected blocking of the vac nozzle can cause a reasonable amount of suction at the bucket and the stock Oneida bucket/top flexes a lot where the cone meets the bucket lid.

DD-Vac-V2 (3).jpg

The overall design places the filter in a small chamber that can be cleaned out if required. I clean mine about twice a year and get a couple of teaspoons of stuff in the filter chamber. Nearly all the spoil gets separated into the bucket under the DD.

DD-Vac-V2 (4).jpg

I cut a hole to fit the neck of the filter. I then use a roundover bit at the router table to make the fit a bit more custom.

DD-Vac-V2 (5).jpg . DD-Vac-V2 (6).jpg

DD-Vac-V2 (8).jpg . DD-Vac-V2 (7).jpg

conti'd
 
Last edited:
Rather than do a lot of measuring I use a piece of cardboard as a template to get the blower ingress hole the right size and in the right place.

DD-Vac-V2 (9).jpg

Version 1 had a round access hole for the filter. While this seemed cool, it gives very little room for your pinkies when trying to re-seat the filter after cleaning. I went square on version 2. I used a bead of silicone rubber and some wax paper to make a custom gasket on version 1.

DD-Vac-V2 (10).jpg

DD-Vac-V2 (11).jpg . DD-Vac-V2 (12).jpg

On version 2 I just use some thin foam that I came up with somewhere during my travels. The green tape is just holding it in place while the glue dries.

DD-Vac-V2 (13).jpg

The same threaded rod that secures the filter extends far enough to secure the door as well.

DD-Vac-V2 (14).jpg . DD-Vac-V2 (15).jpg

The blower on this vac has a soft rubber gasket on the blower itself. Version 1 had the gasket on the barrel and so required that I make one. This is much easier.
DD-Vac-V2 (16).jpg

contid.
 
Last edited:
The blower literally just sets on the floor and pokes through the hole. It sucks up tight when the vac is turned on.

DD-Vac-V2 (17).jpg

It passed the alpha test. I will slap some sealer on it and move on.

DD-Vac-V2 (18).jpg

The filter chamber is built in such a way that the bucket/DD can be stacked on it to save footprint. Currently the only place in my shop that has the height to allow this is out in the middle of the floor. I make liberal use of my walls for mobile machine storage, lumber, tool cabinets, clamps, etc.

But, it is ready to stack should my shop get rearranged to allow it.
 
Last edited:
Looks good Glenn. How often do you have to clean that pleated filter? and how dirty does it get? I see you have it coming in on one side of the box and just curious if one side gets more buildup than the other or if it's pretty even
 
Looks good Glenn. How often do you have to clean that pleated filter? and how dirty does it get? I see you have it coming in on one side of the box and just curious if one side gets more buildup than the other or if it's pretty even

The inlet enters to one side of the filter. coverage is pretty even. I stretch a panty hose over the filter and it is a Clean Stream filter. About twice a year I pull the filter, peel off the panty hose and shake it out, tap the filter on the side of a trash can and hit it with the hose. I have two of these setups and three Clean Stream filters so there is always a dry filter ready to swap into service.

So did you pitch the vacuum and keep the motor, or is storage of it taking up yet other space?:huh:

Funny you should ask . . . I kept the barrel from version 1 "to make sure it worked out". 4 years later it was still in the rafters. I took it down and then put both barrels out at the curb about 6am this morning; they're gone . . . its magic :D
 
Dust Deputies sure work well, don't they.

A couple of years ago I moved mine from the Shop Vac to connect it just ahead of a re-purposed whole house central vacuum unit, andI now have inlet ports located in several locations in the shop, one in the shop attic, and one in the outside wall next to the passage door, so I can take the hose outside and vacuum the cars and trucks with it too. The exhaust is piped to the outdoors, so when vacuuming in the shop no dust, not even the micron sized stuff, ever makes it back into the shop Almost nothing ever gets past the Dust Deputy anyway.

My Dust Deputy is now on a 25 gallon re-purposed metal grease barrel. I made a new plywood top for the barrel and attached the Dust Deputy to it. I sealed the lid to the barrel using 1" closed cell Weatherstrip, and it sealed perfect on the first try. Before getting the metal barrel I had put it on top of a plastic 5 gal pickle barrel from Firehouse Subs that I had been using whith the Shop Vac. Because I had heard that these were stronger than the white ones I had been picking these up, and they worked well when hooked to the Shop Vac. About 2 minutes into my first use after connecting it to the Central Vacuum I heard a thump noise, and found the pickle barrel had imploded. After studying the problem, I realized that the Firehouse Subs pickle barrels had external ribs on the top 1/3 of the barrels. So I got the bright idea to stack three of them together to triple the barrel thickness and also put ribs the full length of the top barrel. It worked great, and I used my central vacuum and Dust Deputy this way for a year and a half before getting the metal barrel and putting it into service. For the amount of saw dust that I pick up, I can probably go several years before I'll need to dump it. For my DeWalt 735 planer, I have the hose/barrel cover option and always use it outside in the driveway with a 60 gallon plastic barrel. My Unisaw contains most of it's sawdust until I shovel it out.


I only use this vacuum system for cleaning the shop floor, vacuuming the vehicles, the scroll saws, sanders, and drill presses, where high air flow isn't really required, and it's been a great addition to my shop, mostly because I'm not falling over a the shop vac anymore.. A a bigger true shop dust collector system would be great, if I had the room for one (14 X 26 shop with a 2 car garage amount of tooling in it).

Charley
 

Attachments

  • DSCF0478.jpg
    DSCF0478.jpg
    55 KB · Views: 35
The central vacuum came out of the house next door when they did a massive remodel. I saw it headed for the dumpster and asked for it. I was told that it didn't work, but that never bothered me with anything that I've acquired free. It turned out to be a bad control transformer that cost $14 to replace. Over the next two weeks the hose and attachments showed up, as well as all of the inlets and pipes. I spent about $80 on additional new pipe to get it completely installed. The routing in my shop building required more elbows than I would have liked, so the velocity at the most commonly used inlets is less than I was hoping for, but it works.

It pulls a much higher vacuum than a Shop Vac, but looses quite a bit of velocity pulling through all of the plumbing and all of the fittings that were necessary. Still, it's been much better than the noisy Shop Vac and having the Shop Vac always in the way in my small shop. Putting it in the shop attic with the exhaust ported to the outdoors made it so quiet in the shop that I have left it on a few times, so I now have an orange light on the shop ceiling that lights whenever the vacuum is running, to remind me. A central vacuum would be worthless in a wood shop without the Dust Deputy ahead of it. I had tried that when I first got the central vacuum unit, and fine scroll saw saw dust plugged the fabric filter in a couple of hours of use.This filter was doing so little after the Dust Deputy installation that I have now removed it from the central vacuum. The collection container on the bottom of the central vacuum has remained empty since the Dust Deputy arrived, with the exception of a small trace of dust on the inside. About as much as the old TV sets collected on the screen after several months of use.

It was a good learning experience when I imploded the first Firehouse pickle bucket. I had never had a problem with the Shop Vac, but after I moved the Dust Deputy and bucket to the central vacuum system, I imploded my first bucket the first time that I picked up a wood chip while vacuuming the shop floor. I scratched my head for a while and then came up with the idea of putting three buckets together to make the one in use stronger. That worked fine for over a year before I switched to the metal barrel, and it will likely be a couple of years before I can fill that metal barrel.

I have pictures of the imploded bucket and the three stacked together, but can't find them. These pickle buckets are quite strong and are available for a $2 donation each that supposedly goes to the local fire companies. The only problem with using them is that if you vent your system into your shop, it's going to smell like dill pickles for a couple of months. Eventually the saw dust soaks up the pickle smell though.

Charley
 
Top