Stuart Ablett
Member
- Messages
- 15,917
- Location
- Tokyo Japan
Forging ahead with the new square body forge.... 
I got the Isolite bricks................

That is 7 bricks, they cost about 680 yen each, so about $5.50 each, and the ceramic tile things ($1 each) are for covering the bottom of the forge, as they are easily replaceable and should wear better than the super soft Isolite bricks.
Thus, I'm into the forge for around $40 (not counting the other stuff I already have from the other forge I built,the gas regulator, the popane tank etc).

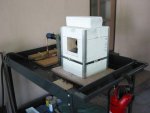
This is the basic idea, with a back piece too.
I'm going to cut the bricks a bit,to make better, tighter joints, and then I'll wrap the whole thing in fairly thin plate metal to make it durable and somewhat portable.

To cut the blocks, I just use a hacksaw, works well, but you DO wear the blades out. Took two blades, could have taken three really, as the last cuts I was wishing for a new blade! (I only had two hacksaw blades ).

This is what a cut brick looks like.

The bottom two bricks cut.....

The sides in place.........

........with the shelf tiles in place.

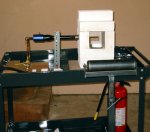
OK, the bottom, side and top are done!
On to the back, this took a bit of noodling and some cutting, but I like the way it turned out, I don't think I'll have much trouble with it.......

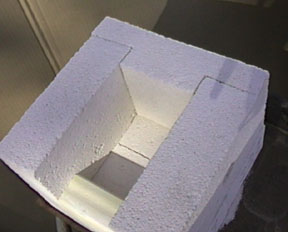
Taken apart to give you an idea of the joint.....

last one, need to start anohter post!
I got the Isolite bricks................
That is 7 bricks, they cost about 680 yen each, so about $5.50 each, and the ceramic tile things ($1 each) are for covering the bottom of the forge, as they are easily replaceable and should wear better than the super soft Isolite bricks.
Thus, I'm into the forge for around $40 (not counting the other stuff I already have from the other forge I built,the gas regulator, the popane tank etc).
This is the basic idea, with a back piece too.
I'm going to cut the bricks a bit,to make better, tighter joints, and then I'll wrap the whole thing in fairly thin plate metal to make it durable and somewhat portable.
To cut the blocks, I just use a hacksaw, works well, but you DO wear the blades out. Took two blades, could have taken three really, as the last cuts I was wishing for a new blade!
(I only had two hacksaw blades ).This is what a cut brick looks like.
The bottom two bricks cut.....
The sides in place.........
........with the shelf tiles in place.
OK, the bottom, side and top are done!
On to the back, this took a bit of noodling and some cutting, but I like the way it turned out, I don't think I'll have much trouble with it.......
Taken apart to give you an idea of the joint.....
last one, need to start anohter post!


 that goes around the bricks, top, bottom and both sides. I think this would also have the advantage of being able to open it up to exchange bricks if one got badly damaged somehow.


 And you don't want it white all the time, bright orange is good, IMO, but yellow ain't bad either. I guess when it's going white is when it's sparklin'...beyond that and it's melted. I guess that's the trick with welding, you get it right in between the yellow/straw at which point the flux does the work. I've only done a few forge welds in a coal forge, but there's a green flame when the flux catches, it's kinda a cool color...