Okay, 9 doors = 36 corners

...I choose 9 circles rather than 36 individual pieces!!!!! Better do several extra circles for R and D..
Since this is an important part of the package I needed to figure out how to do the bead.
I knew it had to be with the circle using a 1/4" bead, at least for the doors. So to start, I figured about 11 circles would allow me to experiment and still get to the required finish line of 36 corners.
Reproducing 11 circles exactly the same size was relatively important to me at this juncture.

Actually necessary.
Ed often quotes a chef he worked with saying "perfect will be just fine". It works here too.

Making exact duplicates from a pattern
First you need a perfect pattern. If it is not perfect then guess what?
Your results will mirror your less than perfect, funky imperfect pattern! At this point you have a choice. You can chose to do whatever is necessary to make your pattern exactly correct ( Bad News...actually you need at least 2 patterns as one needs be the master pattern from which you can make more useable patterns. Good news...you can make the second easily with the first pattern) or you can use the slightly imperfect pattern which probably sucks and get maybe 1000 or so reproductions which suck exactly the same.

Sorry but true.
However,there is more good news for the pattern that sucks. When reproduced enough and put together in a design even ugly shapes can take on an attractive flair.
This is also true!
#1 We have a perfect circle made with 1/4" plywood. Trace around it. Now trace another circle around it just a wee bit larger using the edge of the circle as your guide.

#2 The circle...

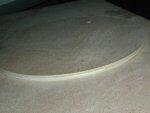
#3 Cut the circle on a saw making sure not to cut away the inside pencil line.

#4 More pics rough cutting the circle on the bandsaw.
[


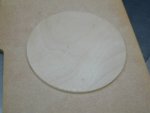
#5 This is the finished roughcut circle.

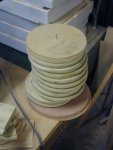
I traced and cut 11 circles in this fashion. They were however traced onto 11" wide poplar. Earlier I had surfaced this poplar to about 3/4" strong along with all the poplar needed for the stiles and rails for these same doors.
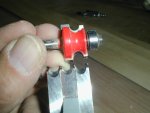
#6 Here you see the router height adjustment being made to cut the 3/4" plywood while still allowing the roller bearing to contact the 1/4" pattern. (unplugged)
( A thicker pattern can be made from the perfect 1/4" piece. I start by making a thinner pattern as it is easier to smooth and correct than a thick one. Once the thin one is perfect the reproductions should be of equal quality.)
The router is shown in this photo upside down, unplugged. In this case I then turned the router over and held the router upright moving it around each circle rather than using a table with the router set into it. It can be done either way.

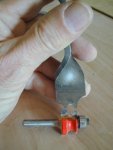
#7 Here is the pattern and the copy.

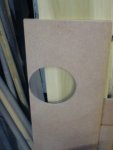
#8 This picture shows the circle fitting into the hole for which it was intended.


Okay, finally we are ready to push on with the making of the beaded 1/4 rounds.
My experimentation was at first mental. I have three 1/4" bead making options.
#1. a 2 wing cutter for the table saw.
#2. a molding head for the table saw that accepts 3 knives. For this I
can use a 3 bead cutter.
#3. a 1/4" bead cutter for the router.
Remember I do have straight runs of beaded molding and then there is the curved 1/4 rounds
! I guess the straight and the round should match up
.
Shaz
Now What?
What do you think?

 ,
,.jpg")


.jpg")
.jpg")
.jpg")

.jpg")
.jpg")