This is great Chuck, thank you. I really appreciate your taking the time to explain verbally and graphically.
When I discussed "gluing" the top part of the mechanism, I was taking into account it needed to rotate, so I was thinking the following:
- After turning all three sections of the mill (Cap, Top, and Bottom),
- Glue the bottom part of the mechanism up in to the bottom section of the mill,
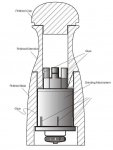
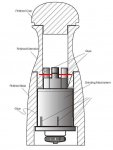
- Holding the bottom section of the mill (with the top of the mechanism 'sticking through') glue it into the middle section of the mill (being careful not to get glue in the 'rotating' part of the mechanism).
The method I describe requires a cap for filling as the middle and lower parts of the mill would not be able to be separated.
I do look forward to seeing the cutting of a tenon to hold a pin. I do understand the need to offset it, due to the placement of the pins on the upper part of the mechanism.