
Rich Aldrich
Member
- Messages
- 296
- Location
- Manistique, Michigan
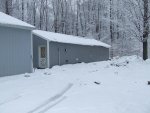
I finally got around to taking pictures of my shop. The shop is 20 x 52. 20 x 28 is heated and insulated. The remaining 20 x 24 is for cold storage. This is where I can store purchased lumber and dry lumber that I have had cut off my property. See Shop Picture
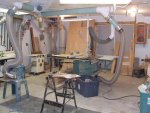
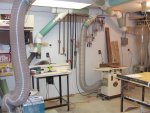
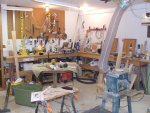
The next pictuer shows the area I have been concentrating on organizing. It is nearly complete. Once I put the addition on the fall of 2006, I put all of my lumber in the unheated addition, except for what I plan to use in 3 weeks time.
You can see the Clearvue and ductwork. This has been an ongoing project since August 2007. It is nearly complete. I have to install dust collection for my compound miter saw and I want to make a down draft table for sanding.
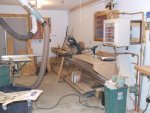
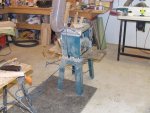
The next picture shows my miter saw station, built similar to the one in Wood magazine. I modified it to fit the space and the saw (Bosch 3915). I also use the bench for pocket hole drilling, biscuit jointing and some assembly until I build my assembly table.
The tablesaw and plywood picture my Grizzly G1023S with the sliding cut off table. I am going to try removing the cut off table and trying sleds instead. It seems to be in the way and I find I have to move the cut off fence on the back to rip other boards. Then I have to square it back up. With a good sled or two, I may save time.
I built the overhead blade guard. I really like it. This shot also shows the reducer/wye combination pieces that I made so I could go from 6" to 5" for the cabinet and 4" take off for the blade guard dust collection. I forgot to take a picture inside the cabinet saw. It is nearly empty of dust. Amazing.
You can also see the plywood storage rack. I am not so crazy about it. With 8 ft ceilings, I have fun getting it in and out of the rack. I am thinking about making a storage cart and keeping the plywood out in the cold storage. I can bring it in as I need it. Also, when I get a saw guide system, I wont have to bring big sheets in this area. I can cut them in the cold storage area and bring them in.
The cold storage area is behind the double doors. This was where my garage door used to be.
The next picture shows my router table and jointer. I need to make a cabinet under the router table yet. I got the plans when I purchased the router table from MLCS, but I havent had a chance to build it yet. It also shows my clamp storage. I need more clamps - my wife thinks I am nuts (probably true, but I still need more clamps).
The planer picture shows my Makita 2012NB planer. I used a furnace floor vent adaptor to make a dust collection hood for the 6" ducting when I hooked it up to the clearvue. It is noiser due to the large volume of air being pulled past the blades. The noise goes away when I shut the blast gate.
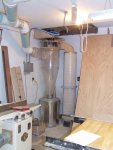
The cylcone picture shows my latest tool project - the Clearvue cyclone. I had to rais my ceiling in this area. I used to have a garage door to the right and the ceiling was already raised. I just had to copy what I did in that area. I still have to put something on the ceiling of this area - it is just insulation for now.
The next picture shows the cabinet that I am building to store all of my small power tools. I am presently working on raised panel doors to finish it off. I have plans to build small organizational storage compartments in it as I go. Dont look at the color of the blinds - I have all girls - the blinds were replaced in the house and beggers cant be choosy.
Next Picture -
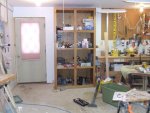
Ok, now this area needs organizing. My plan is to make normal height bottom cabinets with a work bench type top to the corner. Then to the right, I want to make a mobile bench and that will be it's storage area. This is the next area I plan to attack. with organization. That goofy flimsy table will be gone.
This is another shot of my miter saw station. I also have built a screw/nail storage cabinet. You can see the wood storage under the miter saw station. Works great for the boards I need for the next month or so. I just need to stay ahead on the wood brought in.
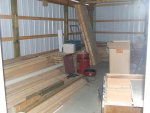
Cold Storage - even in the summer. This picture was taken looking out the double doors of the heated part into the cold storage area. This is lumber storage... also it has my brush hog and boat.
The things that I would do differently:
1. I would build normal walls and foundation, not pole building style. I would have metal walls and still have the same style roof - metal with trusses on 4 ft centers.
2. The ceilings would be 10 ft high.
3. In-floor heat - it wasnt thought of when I put it up, at least it wasnt in my neck of the woods. I started building in 1993. Once the houes was complete, I continued on the shop - that was 1999.
4. I would have built it 28 ft wide instead of 20 ft. The width would help the tool arrangement.
5. The ceiling would probably be drywall, but the walls would have been tongue and groove pine. At the time, drywall was expensive - $10 per 4 x 8 sheet.
The next pictuer shows the area I have been concentrating on organizing. It is nearly complete. Once I put the addition on the fall of 2006, I put all of my lumber in the unheated addition, except for what I plan to use in 3 weeks time.
You can see the Clearvue and ductwork. This has been an ongoing project since August 2007. It is nearly complete. I have to install dust collection for my compound miter saw and I want to make a down draft table for sanding.
The next picture shows my miter saw station, built similar to the one in Wood magazine. I modified it to fit the space and the saw (Bosch 3915). I also use the bench for pocket hole drilling, biscuit jointing and some assembly until I build my assembly table.
The tablesaw and plywood picture my Grizzly G1023S with the sliding cut off table. I am going to try removing the cut off table and trying sleds instead. It seems to be in the way and I find I have to move the cut off fence on the back to rip other boards. Then I have to square it back up. With a good sled or two, I may save time.
I built the overhead blade guard. I really like it. This shot also shows the reducer/wye combination pieces that I made so I could go from 6" to 5" for the cabinet and 4" take off for the blade guard dust collection. I forgot to take a picture inside the cabinet saw. It is nearly empty of dust. Amazing.
You can also see the plywood storage rack. I am not so crazy about it. With 8 ft ceilings, I have fun getting it in and out of the rack. I am thinking about making a storage cart and keeping the plywood out in the cold storage. I can bring it in as I need it. Also, when I get a saw guide system, I wont have to bring big sheets in this area. I can cut them in the cold storage area and bring them in.
The cold storage area is behind the double doors. This was where my garage door used to be.
The next picture shows my router table and jointer. I need to make a cabinet under the router table yet. I got the plans when I purchased the router table from MLCS, but I havent had a chance to build it yet. It also shows my clamp storage. I need more clamps - my wife thinks I am nuts (probably true, but I still need more clamps).
The planer picture shows my Makita 2012NB planer. I used a furnace floor vent adaptor to make a dust collection hood for the 6" ducting when I hooked it up to the clearvue. It is noiser due to the large volume of air being pulled past the blades. The noise goes away when I shut the blast gate.
The cylcone picture shows my latest tool project - the Clearvue cyclone. I had to rais my ceiling in this area. I used to have a garage door to the right and the ceiling was already raised. I just had to copy what I did in that area. I still have to put something on the ceiling of this area - it is just insulation for now.
The next picture shows the cabinet that I am building to store all of my small power tools. I am presently working on raised panel doors to finish it off. I have plans to build small organizational storage compartments in it as I go. Dont look at the color of the blinds - I have all girls - the blinds were replaced in the house and beggers cant be choosy.
Next Picture -
Ok, now this area needs organizing. My plan is to make normal height bottom cabinets with a work bench type top to the corner. Then to the right, I want to make a mobile bench and that will be it's storage area. This is the next area I plan to attack. with organization. That goofy flimsy table will be gone.
This is another shot of my miter saw station. I also have built a screw/nail storage cabinet. You can see the wood storage under the miter saw station. Works great for the boards I need for the next month or so. I just need to stay ahead on the wood brought in.
Cold Storage - even in the summer. This picture was taken looking out the double doors of the heated part into the cold storage area. This is lumber storage... also it has my brush hog and boat.
The things that I would do differently:
1. I would build normal walls and foundation, not pole building style. I would have metal walls and still have the same style roof - metal with trusses on 4 ft centers.
2. The ceilings would be 10 ft high.
3. In-floor heat - it wasnt thought of when I put it up, at least it wasnt in my neck of the woods. I started building in 1993. Once the houes was complete, I continued on the shop - that was 1999.
4. I would have built it 28 ft wide instead of 20 ft. The width would help the tool arrangement.
5. The ceiling would probably be drywall, but the walls would have been tongue and groove pine. At the time, drywall was expensive - $10 per 4 x 8 sheet.
Attachments
-
 Shop.jpg84.8 KB · Views: 358
 -
 DSCF1273 - 1.jpg79.1 KB · Views: 494
 -
 Miter Saw Station.jpg68.7 KB · Views: 375
 -
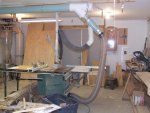 Table Saw & Plywood Storage.jpg75.2 KB · Views: 336
 -
 Jointer and Router Table.jpg90.1 KB · Views: 340
 -
 Planer.jpg86.9 KB · Views: 292
 -
 Cyclone.jpg67.8 KB · Views: 252
 -
 Small Tools Cabinet.jpg76.8 KB · Views: 299
 -
 This area needs organizing.jpg91.5 KB · Views: 370
 -
 Cold Storage.jpg70.5 KB · Views: 279
") Nice play space!
Nice play space! 
 where do you get your tools from? I remember there was a store in Green Bay that had a good selection.