Ian Gillis
Member
- Messages
- 443
- Location
- Nova Scotia's beautiful south shore
Hi
Okay, it's not a Mark Singer tutorial, but I hope it will be informative to those who might need to do this one day.
I bought a reasonably priced panel-raising plane off the Bay. It's been modified in the past - tote and wedge replaced.
Anyway, after honing the blade I tried it out on a piece of exotic Picea rubens OK, it's a red spruce 2x8 After a few strokes the mouth of the plane was blocked solid with chips. Grrrrrr...
Long story short, the culprit was the wedge - it was too short and didn't have the right taper. Shavings had no chance of getting through.
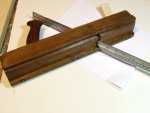
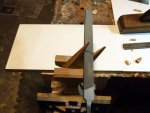
I cut out a little bit of mahogany from the scrap bin and set about to get the correct angles for my wedge. In the first photo you see a steel ruler held in place to get the angle for the top of the wedge. This was repeated for the bottom angle - where the plane iron sits. Trace a short pencil mark onto some paper near both ends of the ruler in each position (4 marks in all). See Pic
2
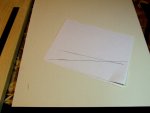
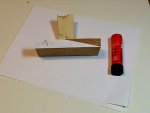
Cut along the lower line of the sheet of paper and glue it onto the side of your wedge stock with the pointy bit (intersection of the 2 lines) at one end. Trim off excess paper as in pic 3.
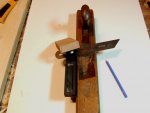
Take the sharp plane of your choice and form your wedge by removing wood according to the glued on template. Make your wedge the same thickness all the way across. The iron on this plane is skewed. This is no big deal. In Pic 4 we have 2 steps in one shot. Use the bevel gauge to get the skew angle from the body of the plane and flip it over to mark the beveled long sides of the wedge. If your plane isn't skewed, just skip the last step.
Continued below...
Okay, it's not a Mark Singer tutorial, but I hope it will be informative to those who might need to do this one day.
I bought a reasonably priced panel-raising plane off the Bay. It's been modified in the past - tote and wedge replaced.
Anyway, after honing the blade I tried it out on a piece of exotic Picea rubens
OK, it's a red spruce 2x8 After a few strokes the mouth of the plane was blocked solid with chips. Grrrrrr...Long story short, the culprit was the wedge - it was too short and didn't have the right taper. Shavings had no chance of getting through.
I cut out a little bit of mahogany from the scrap bin and set about to get the correct angles for my wedge. In the first photo you see a steel ruler held in place to get the angle for the top of the wedge. This was repeated for the bottom angle - where the plane iron sits. Trace a short pencil mark onto some paper near both ends of the ruler in each position (4 marks in all). See Pic
2
Cut along the lower line of the sheet of paper and glue it onto the side of your wedge stock with the pointy bit (intersection of the 2 lines) at one end. Trim off excess paper as in pic 3.
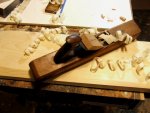
Take the sharp plane of your choice and form your wedge by removing wood according to the glued on template. Make your wedge the same thickness all the way across. The iron on this plane is skewed. This is no big deal. In Pic 4 we have 2 steps in one shot. Use the bevel gauge to get the skew angle from the body of the plane and flip it over to mark the beveled long sides of the wedge. If your plane isn't skewed, just skip the last step.
Continued below...