- Messages
- 12,169
- Location
- Constantine, MI
Look what the nice mail lady brought me today! Working with plywood just got a lot easier.

Last edited:
")

Now get yourself a sheet of 2" rigid foam insulation to put under the plywood you're cutting and you'll be in business!

Good advice - something I will keep an eye on. Thanks.I did buy a second rail connector as the single connector allowed more play than I was after.
Wow, some really good advice. Thanks.I haven't yet convinced myself that I need a track saw, because I bought a long and short straight edge clamps from www.ptreeusa.com before there was much being said about track saws. Because of my knee replacements, I also got away from bending over and working at ground level using a piece of foam as a backer or placing it on saw horses. I built a cutting table.
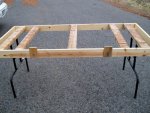
My cutting table is just a roughly 30 X 70" frame made from 1 X 4 pine boards with a 2 X 4 laid flat and flush with the top surface of the frame across the center. Two more pieces of 2 X 4 are across the frame at each end in a similar manor to allow attaching the banquet table legs that I purchased from Northern. The entire frame was assembled with biscuits and Titebond type II glue, so there is no metal at all in the table except for the short screws that attach the banquet table legs. When not in use, the legs fold up into the recess of the bottom of the table, so the table is easily carried and placed against my sheet stock when not in use. Some years back, when it became very difficult for me to load a sheet of material on this cutting table, I added two 3 1/2" squares of plywood to one long side of the table using one screw placed off center in each of the squares, but centered in the 1/4 side of the table. I can rotate these squares so they extend above the table or rotate them so they are flush with the top of the table. For loading a sheet onto the table, I turn these pieces so they extend above the table and then lay the table over on it's side with these pieces down against my driveway. I them place the sheet against the table with the bottom edge of it sitting on these pieces of plywood. I then reach down and pick up both the table and the sheet until the table is again on it's feet, with the sheet laying on top of it. I then turn these plywood pieces so they no longer extend above the table and then slide the sheet around until the first cut line is roughly down the center of the table.
I then use one of my straight edge clamps and my DeWalt 18 volt circular saw to break up the sheet, setting the blade depth for about 1/4" deeper cut than the thickness of the sheet stock being cut. I recently made a saddle shoe for the bottom of my saw that fits these straight edge clamps, so my saw slides down the straight edge clamp much like a track saw. It holds the blade 1/4" from the edge guide, so it's easy to position the guide 1/4" away from the cut line. When breaking the sheet up I can complete a cut and neither the good piece or off cut fall, so there is no damage like often occurs when using saw horses. After I have removed the keeper piece, I then re-position the remainder so the next cut is again roughly down the center of the remaining sheet, and repeat the process. If my cutting table ever gets so many kerf lines in it that I think it's getting weak or too unsightly, I'll just make a new top and transfer the legs to it, but I doubt this will happen in my remaining years.
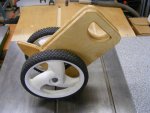
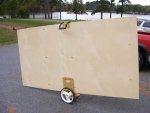
I also made a sheet stock carrier from some scraps of 3/4" cabinet Birch and the wheels and axle stubs from an old rotary lawn mower. You can buy these new, but this mower was headed for the scrap yard anyway. I made the center gap 1" wide, so the carrier would easily fit any thickness of stock up to 1". I sometimes have sheets of 1" Baltic Birch, and use it for these too. In use, I drop the sheet into the slot with this carrier roughly centered under the bottom edge of the sheet for an approximate balance, or I can place it under one end and carry the other end of the sheet. This is my second version of this carrier. I made it taller and with hand holes, so I could carry and position it easier. Since the donor lawn mower was a high wheel version, I used the larger two rear wheels of the mower for this carrier, and found that it goes over rougher terrain and over the threshold of my shop door easier too. If the wind isn't blowing a full 4 X 8 sheet of 3/4 cabinet birch will even stand on edge in it while I take the pictures. A Gorilla Gripper is pictured on the top of the sheet, but I've found that as I age and become more bionic (metal knees and heart surgeries) I'm finding that I
do better carrying sheet stock using a Stanley sheet carrier like this one. https://www.amazon.com/Stanley-93-301-14-Inch-Yellow-Handle/dp/B00004UDN8 . It's considerably cheaper too at just under $10.
Charley
 It has seen better days. It was past time for an upgrade.
The other circ saw is a Craftsman that my grandmother bought for me when I built a small deck for her behind her house... in 1969.