A Small Hinged Box - Earrings

glenn bradley

Member
Messages
11,547
Location
SoCal
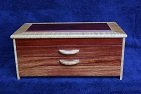
I always enjoy people's threads about boxes. I don't know why they are so intriguing. This is a hinged box for earrings. There is a sliding upper piece the rests inside but that will come later. This one is walnut for the top and bottom with cherry for the sides. This is a little different for me in that the bottom has a function other than just closing off or supporting the box.

A template out of some scrap and a bowl bit.

a-box-earring.jpgb-box-earring.jpg

A gooseneck scraper help clean up the relieved inside of the top. This is mostly just to reduce weight. One of those Milwaukee bits off of Amazon for pennies on the dollar handles the top profile.

c-box-earring.jpgcc-box-earring.jpg

Same router bit and a different template make the dividers in the bottom. A slot bit and a beaded cove profile the bottom piece so that things lock together. The top and bottom are floating panels.
d-box-earring.jpge-box-earring.jpg

Once you have things glued up and splined, take a cut that almost separates the top and bottom. Then use a razor knife or a gent's saw to finish the separation. Once they are apart I use a flush saw to clean up.

f-box-earring.jpgg-box-earring.jpgh-box-earring.jpgi-box-earring.jpg
 
Last edited:
These 90+ degree stop hinges are a bit fussy as you can't lay them open like butt hinges to line things up. This is why the top is relived of some mass; don't want the top to take the box right on over when the hinge stop gets hit.

Anyway, I tape the hinge in place and trace around it with a marking knife. I then pre-drill the holes.

j-box-earring.jpg

I chuck up a spiral bit and position stops to hog out the waste for the hinge. This method is quick and accurate but, leaves a bit of chisel work to make things fit just right.

k-box-earring.jpgl-box-earring.jpg

I've got to scoot out to dinner with LOML but, I'll make some more progress tomorrow night. Hopefully to the point where you can see where I'm going with this thing ;-)
 
Last edited:
Nice piece of chocolate for the lid! :thumb: :thumb:

I need to make some boxes. There's something really satisfying about them... :thumb:
 
Very nice Glenn, thanks for the detail and posting it.:thumb: Are we right to take it that you finished the walnut on the interior side of the top and bottom before assembly?
 
Yes, to some extent. If I am going to finish the interior of a small or pesky piece, I will pre-finish it before assembly. I will apply a final finish once everything is sanded or scraped to where I want it but, the pre-finish keeps me from having to reach every little nook and cranny while still achieving a consistent look ;-)
 
OK, I got a bit more done tonight. Gives a better idea of where I'm headed. A yet-to-be-shaped ebony pull will be set into front of the top.

m-box-earring.jpg

Hinge holds the top open. Upper tray slides. This is for LOML's larger bangles. The "trays" could be sized to fit more pairs of smaller earrings and this tray may get replaced before all is said and done.

n-box-earring.jpgo-box-earring.jpg
 
The ebony pull didn't look good to me. It was all sudden-like and drew attention away from the figured top. I change to a walnut pull. Using the Grr-Ripper I ripped a thin piece and then a thinner piece of walnut from a blank. Again with the Grr-Ripper I ran a FTG slot in the larger piece. Glued the tongue into the larger piece and rough cut to size on the little bandsaw.

p-box-earring.jpgq-box-earring.jpg

Here's something I saw Garret Hack do watching him on video; he puts a mark as a reminder of where to stop when planing, paring or sanding.

r-box-earring.jpgs-box-earring.jpg

I use the sized pull and a marking knife to layout the mortise for the pull. I don't usually get so close to the "other" edge when mortising but, I wanted to match the strip left visible by the hinge placement. I picked up a Lee Valley chisel on sale and re-ground it to 20* for use as a paring chisel. Came in handy for the final shaping of the pull mortise after I hogged it our with a butt chisel. The strip of ash in the lower left corner of the pic on the right is to support the cherry frame while I whack on it. Without this support you are relying on the floating top panel to absorb the shock. Not good; DAMHIKT.

t-box-earring.jpgu-box-earring.jpg

So that gets me here.

v-box-earring.jpg

Looks a little washed out color-wise as much of the pre-finishing has gotten scraped off during the final surface prep work and I haven't blown all the micro-dust out of the pores yet. A sharp scraper is the way to go on that figured walnut :thumb:. I need to glue in the sliding tray supports and then it will be time for some shellac.

-184
 
Last edited:
A small hinged box-Earrings

Very nice tutorial,beautifull figure,Hope you don't mind a bit of criticism,but to me the lift is just a tad to big,as it takes away from the box.other than that the box is very nice :)

May God Bless
Ken
 
,Hope you don't mind a bit of criticism,but to me the lift is just a tad to big,as it takes away from the box.

On the contrary. I am glad you said that. I have been struggling with it and have not yet attached it as I am primed to pare it down. Thanks for the constructive comments.
 
Last edited:
A small hinged box-Earrings

Thanks Glen,A suggestion.take it back about half way and round it off into a half moon shape.I use that style a lot on my boxes. :)
 
Glenn Why does changing the bevel from 25* to 20* make a difference.??? I'm not doubting it I'm just trying to learn something.:)

The lower angle eases the paring effort and increases control for me. At this angle the chisel wouldn't care much for mallet work however ;-)
 
After some more pondering about the pull combined with thoughts about where the box will sit, I ended up here.

x-box-earring.jpgw-box-earring.jpg

Finish is just a clear dewaxed shellac. Other pieces out of this cherry have aged to an almost brown color that blends well with the walnut. But then again, I just like walnut. Thanks for the comments and suggestions, one and all. Now I just have to stash it till Valentine's Day ;).
 
Last edited:
Top