Getting Good Parts Dwgs from a SU Assembly

Ken Close

Member
Messages
69
The recent poll by Dave Richards was interesting, especially as I am using SU for all of my design work.

I am struggling with how to get working, dimensioned drawings of parts from the screen onto paper to take to the shop. On complex assemblies, this does not seem to be an easy or intuitive task.

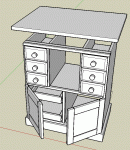
I am trying an approach where I copy components and move them to other parts of the drawing space, dimension them there, and then print out the individual pieces. The attached pictures show an example.

My question to all of you is this: how do YOU get working, dimensioned drawings into the shop to make parts from?

Thanks for sharing your approach(es).

Ken
 

Attachments

  • A1.gif
    A1.gif
    19.6 KB · Views: 22
  • A2.gif
    A2.gif
    94.3 KB · Views: 23
I don't want or need detailed parts but I have wondered about this too, or something similar.

I would like to be able to explode the assemble just to look at the parts and be able to measure a couple of things. I prefer to start with a few basic dimensions and fit the parts as I go. So detailing each part is not what I want, but sometime I would like to be able to look at a part and measure it or part of it.
 
Normally, I don't explode or copy the components but I like that idea, too.

When I want dimensioned drawings on paper in the shop, I usually create one or more "dimensions" layer(s) to hold all the dimension elements. Then I may configure a scene with those various layers visible for a given part or assembly and print that.

Another way I've done it was just to throw the crucial measurements in there and print that. This is usually only done with simple stuff that I'll "fine tune" while building it.

I admit I haven't built a complex enough project that was first designed in SketchUp yet. That'll change soon, though. I have an entertainment center using frame and panel construction all designed up to scale and ready to go. It's going to require some very precise drawings for various components and assemblies. I'm not sure how I'll come up with print outs for this one. I may just bring my laptop out into the shop and measure each thing as I need it.

Then again, I may do like you're doing and pull copies of various components off to the side and dimension them there. It's also not a huge problem to run into the house and toss together a quick measured drawing as needed sometimes. Other times, that would completely interrupt the flow of work, though.

Yep, I'm interested to see what everyone else does, too.
 
Before Sketchup I did detailed 2D drawings with key measurements shown. I then lettered each part in the drawing and prepared a list of materials by letter giving the dimensions for each piece. After learning Sketchup I now find it much better to draw the detail in SK making each piece a group then explode them into another view to show the critical joints and key measurements. I still find it helpful if I prepare a list of materials with dimensions as well as print the key exploded views for use in the shop. Ron
 
Ron: can you be more explicit and descriptive about how you "explode" the group. (I realize the Explode command disconnects all the elements from the group or component, but how do you mean it?).

I should have mentioned that I am using the free SU version; maybe this is not an issue for the Pro version. My experiments today with printing elements was not the greatest in terms of clarity of the view. Lines blurred together (those too close to other lines) and dimensions that were on axes not parallel to the view were distorted and hard to read.

I have an assembly and detailed drawings done in DeltaCAD (a really simple and low cost CAD package) which are clear, even when small, and fit entirely on four sheets which can be pasted together.

SU has many great features (for design and checking assembly clearances etc) but printing is not one of its strengths. As I said, maybe the Pro version solves all of this but $500 to get better printouts is not exactly my idea of a wise expenditure of dollars.

Ken
 
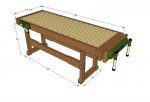
Hello Ken, If you make each piece a separate group or component then you can manually move them apart (explode) with out affecting the other parts. You can then move or copy them to other areas with in the drawing, add dimensions and print that view. Here is an example of a work bench that I did based on the Popular Mechanics version. It shows how I did the exploded view with some dimensions added. Ron
 

Attachments

  • Workbench (Medium).jpg
    Workbench (Medium).jpg
    44.4 KB · Views: 16
  • Workbench-detail (Medium).jpg
    Workbench-detail (Medium).jpg
    33.7 KB · Views: 18
  • Workbench-detail2 (Medium).jpg
    Workbench-detail2 (Medium).jpg
    16.5 KB · Views: 12
Last edited:
Ken, first, you don't need to buy the Pro version to make the exploded views that you want. You can do what you need with the free one.

Next, don't use SketchUp's Explode component or Explode group expecting to make an exploded view. The Explode functions, as you've discovered,undo the group or component geometry and will cause you headaches when you try to separate the parts of the model.

To make the exploded view you simply move the elements of the piece away from each other so you have the desired space around them.

Another way to handle this sort of thing is to move selected components to other layers and then turn on those layers for different scenes. For example, in the case of Ron's workbench he could have put the components of the leg assembly on a layer of their own. i.e. Leg Assembly. Then dimensions could be put on another layer. i.e. Leg Assembly Dims. Now, with the other components and dimensions similarly moved to discreet layers, they could all be hidden by unchecking their layer's visibilty boxes. A Scene could then be made to show only the leg and its dimensions. Maybe the parts of the leg assembly get put onto a couple of layers and a couple of scenes are made. It all depends on how much detail you want.

Perhaps you would see enough by making an X-ray view and adding some Text or Leader Text. There's no reason you couldn't make notes that describe some of the smaller details such as joinery dimensions. then you don't need the close ups of the joints. Put that text on the Dims layer or on its own layer as desired.

If there are a few details you'd still like to see close up, you might copy the components involved and move the copies closer to the camera so they appear larger with the rest of the assembly in the background. SketchUp's depth of field is infinite so you can get away with that.

Doing things this way means you don't need to create an exploded view of the model. After you've finished all that you go through and print each scene.

I hope all that makes at least a little sense.

Dave
 
Thanks Dave, that is what I did on my last one. I just (tried anyway) to put each sub assembly on a layer.

I thought I saw a plugin mentioned on another forum that would explode components. But I have searched and can't find it, so it must have done something else, but I would have sworn that was what I saw. :dunno:
 
Jeff, you aren't mistaken. There is a plugin available from smustard.com that will do this. I have this plugin but rarely mention it because the user interface is difficult. The author of the plugin told me that but said he's working on a new version that would be easier to use. He's also got lots of other stuff on his plate so it might be awhile before it gets done.
 
OK I feel better. I just knew I had seen it. That would suit my style well. But I am not going to look for it then. Layers will work.

BTW I am working on a new computer so maybe I can run 6.0.
 
Ron: thanks for the illustrations.

Dave: thanks for the alternative of layers. I want a process that allows me to see the full assembly and then the dimensioned parts, so that will do it. I will have to experiment to see if that offers greater "utility" or "efficiency" over one in which I copy the components (and perhaps then explode them) to new locations and define them in a scene. I can then auto scroll to each area with one click vs having to do a lot of "juggling" of layers on/off check marks. But, I will try it to get actual experience and then decide.

Is there a ruby script somewhere that automatically prints your list of "scenes"? Seems like it might be pretty simple and then printing all parts might just be to print the scenes.

Thanks, guys, for all the ideas.

Ken
 
Ken, you're welcome. As far as a script for automatically printing the scenes, I think there is one. When I get a mooment I'll check my sources.

One note about using layers. Always, always leave Layer 0 active. Never make other layers active. There's no need to make other layers active. When you edit components on other layers you are working on that layer anyway.

Oh, and another thing. Just make components of all the parts. Don't use groups. Components can be named and given attributes. Groups can't. This makes using the Outliner more effective and makes plugins like the Cutlist script work.
 
Layers for dimensioned parts....after much more searching on the net and experimenting with layers, I have concluded that the approach which Dave suggested is the preferred one. Exploding by moving components away from each other after copying will work, and may be, in some cases, the easier approach. But for my complex router stand, I began having trouble with being able to "see" other parts in the far background when I rotated a component just slightly. In this case I would be faced with "hiding" the components showing in the background, thus adding more effort to the approach.

Putting the components and their dimensions on their own named layers and then turning them on and off allows the most flexiable approach, in my opinion.

I will post the completed router stand in the near future for illustration (and I want some inputs on the router design approach I am taking).

Thanks for all the inputs.

Ken
 
Top