Alright Brent, here's the download. I actually answer your question at the end...
99% of the time, the first thing we do is remove the existing hardware from the back of the picture. That especially includes any wire or cable that the framing shop has installed. Not that the cable is bad, there are just better ways to do it. (But there are a few times the cable is the best way to do it, too. It's definitely faster if you're hanging a single piece by itself, but not as accurate height-wise. It's also easy to knock a cabled piece out of level, unless you're also using an anchoring putty like Quake Hold.)
We generally use three types of attachment systems:
Straps and Hooks
With this method, we attach metal straps with D-rings to the artwork, and nail hooks to the wall. The most common types of D-ring straps looks like these:
We use a slightly different kind that has a bigger "hole" to hang from, which gives us a little leeway with our hook location. We have various sizes, in 1-hole to 3-hole versions:
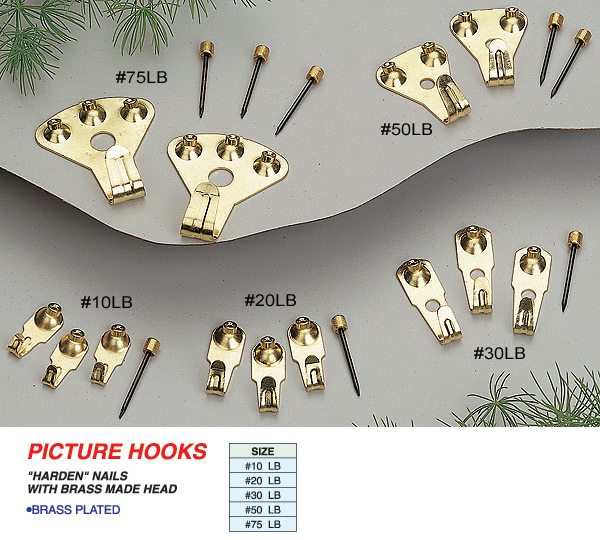
The hooks we use aren't the typical hardware store picture hooks. We use hooks with pin nails, which leave very small holes in the wall. We carry a range in sizes from 1-hole to 3-hole versions. Because of the small holes, these hooks can be moved slightly to fine-tune their height. (It's pretty easy for the straps to not be in exactly the same positions on the two sides of the frame. Sometimes, after hanging the piece, you'll discover it needs to be tweaked a little to get it level. With the pin nails, it's easy re-nail a hook a smidgen lower than it was before.) These are similar to the ones we use:
Once the straps are attached to the back of the frame, it's a simple matter of nailing two hooks to the wall and hanging the piece on the hooks. The trick is getting the piece level, centered and at the desired height. I'll post a quick tutorial on one way to do that once I get done with this post.
We've hung some pretty heavy pieces on a pair of the 3-hole hooks and straps. If we want a little extra insurance, we'll leave out the middle nail and put a plastic wall anchor in the hole in the middle of the hook, with a washer and 1 1/2" sheet metal screw driven into it.
Plates and Clips
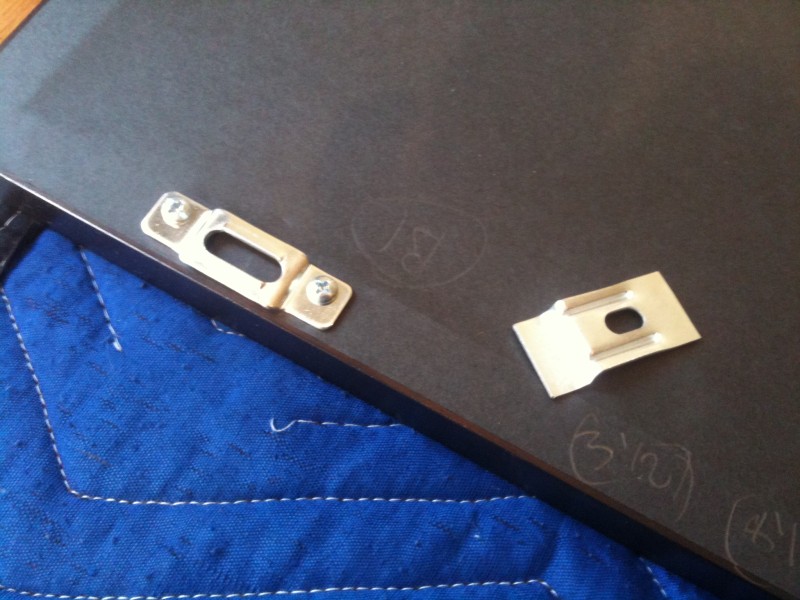
Here is a plate (on the left) and a clip (on the right).
A pair of plates are attached to the back of the frame, along the top edge. Here are three pieces with the plates installed:
As an aside, you see that plastic hardware box in the background? We have two like that, stocked with the same assortment of hardware, and I'd say 95% of the time, all the hardware we need is in those boxes. For the other 5% of the time, we have 5 large plastic bins in the truck, with probably a dozen smaller parts boxes in them, with a very wide variety of screws, bolts, anchors, and other hardware. (That's along with 4 ladders, two primary tool bags, 5 or 6 smaller tool bags with seldom-used tools like the 18v hammer drill, packing blankets, a collapsing hand cart, an 18v shop vac, and all sorts of other assorted stuff. The longbed pickup is pretty well packed.)
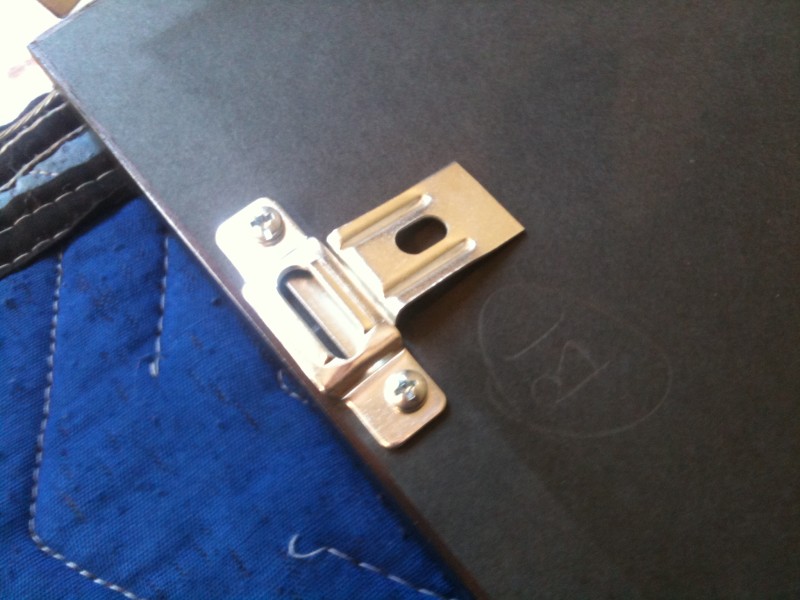
Back on topic, the clips are attached to the wall with a plastic anchor and a 1 1/2" pan head sheet metal screw. (Or if we hit a stud, just the screw into the wood.) Once they are attached to the wall, the artwork is hung from the two hooks. Here's how they engage:
You'll notice the oval hole in the clip...it allows vertical tweaking to fine-tune the level.
On metal picture frames, we don't install the plates. Instead, the clips hook directly onto the metal frame.
For extremely secure installations, we'll also install one or two plates at the bottom of the frame, and screw t-bolts into the wall to fit into the slot in the plate. Here's a t-bolt and anchor:
When the "T" is horizontal, it can slip into the slot on the plate. Then, we use a special wrench to reach behind the frame and turn the t-bolt 1/4 turn, thus locking it into the plate:
The t-bolt is great for pieces in public places (for theft prevention) and also to earthquake-proof things like mirrors or artwork over a bed. In most cases though, it's overkill. The clips alone are a very stable mounting system that would hold up in all but the worst earthquakes. (And in a quake that big, pictures on the wall are the least of your worries.)
Cleats
For some very large or heavy pieces, we'll use wooden or aluminum cleats. Most of the wooden cleats are typical French cleats, with the edges of two opposing boards cut at 45º. We carry several 6' lengths of pre-cut 1x material in the truck so we can cut them to whatever lengths we need.
Other times, the cleat edges will be square, and we will drive a few screws down from the top, through the top cleat and into the bottom one. (We used that method to hang a 200 pound frame over and around a large plasma TV. Since the frame was a tight fit to the TV, we couldn't lift it up to engage a French cleat. Instead, we slid it straight onto the cleat and screwed it from above the frame.)
The aluminum cleats we use are commonly called z-bar. Here's a pic:
It's essentially the same concept as a French cleat. We also keep a few 6' lengths of z-bar in the truck, too.
Most of the time when we're using cleats, it's because the piece is heavy or it sticks out from the wall quite a bit. For that reason, we try to hit studs with lag bolts for at least some of the attachment points, and usually use toggle bolts for the places in between the studs. One disadvantage to cleats is that they are a bit harder to tweak for level after things are attached to the wall. We usually use shims to level things out if necessary.
So that's the basic explanation of what we use. As I said, I'll go post
something in the Tutorials area showing how I hung a picture with straps and hooks in my house tonight. I'll try to get some pics of a clip and plate installation later.
To answer your original question, I'd recommend the plates and clips for hanging a grouping of four pieces. They offer the easiest vertical adjustment for fine-tuning things. You'd need four of these, although you probably don't need or want the t-bolts on the bottoms of the frames:
http://www.picturehardware.com/T-Screw-Security-Hangers/Wood-Security-Hanger-Polybag/prod_5.html
Does that answer your question?


 it will be just a tiny bit higher or lower than the first one.