
- Messages
- 8,052
- Location
- falcon heights, minnesota
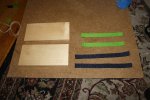
since i had the camera out anyway, i thought it would be a good idea to take the usual step by step pics of how they went together. well kids, here we go...
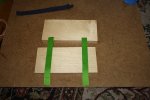
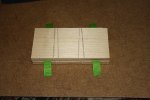
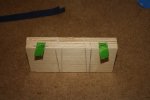
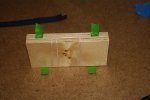
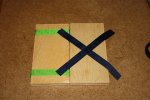
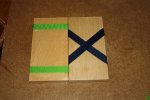
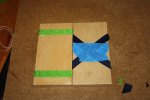
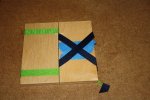
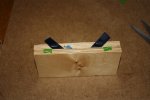
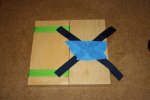
the wooden part can be anything you want, i used some extra 3/8" baltic birch plywood i had in the shop that wasn't doing much more than collecting dust. the ribbons are 5/8" wide by 18 ft long (enough for spares in case you goof up). the finish on the wood is just sanded to 220 and 2 coats of shellac lightly scrubbed with 220 for a nice not too shiny texture. on to the really fun part now. in the first six pics (as there are 12 of them, this will be in 2 posts) we have everything that we need, the wood has been cut to 6 5/8" x 3 1/4", and finished as previously mentioned, along with both sets of ribbons, cut to well over needed lengths. then i lay out the horizontal ribbons close to the marks that are 3/4" in from each end on both blanks. then i put the other blank on top, and secure the whole magilla with a pair of rubber bands. then i move the outside edges of the ribbons to the marks that i had made, and staple them down. after that is done, flip it over and pull the ribbons over to the marks, making sure that the ribbon is tight, and staple the ends down to the opposite edge from the other side (staple the one set of ends to what would be considered the top, and the other set to what would be considered the bottom), you can see this in the one pic, the stapled ends are pointing to the back, and the ones to be stapled towards the front. now that the horizontal ribbons are in place, you need to lay out the x, making sure to keep the edges of the x to the inside edges of the horizontal ribbons.
the wooden part can be anything you want, i used some extra 3/8" baltic birch plywood i had in the shop that wasn't doing much more than collecting dust. the ribbons are 5/8" wide by 18 ft long (enough for spares in case you goof up). the finish on the wood is just sanded to 220 and 2 coats of shellac lightly scrubbed with 220 for a nice not too shiny texture. on to the really fun part now. in the first six pics (as there are 12 of them, this will be in 2 posts) we have everything that we need, the wood has been cut to 6 5/8" x 3 1/4", and finished as previously mentioned, along with both sets of ribbons, cut to well over needed lengths. then i lay out the horizontal ribbons close to the marks that are 3/4" in from each end on both blanks. then i put the other blank on top, and secure the whole magilla with a pair of rubber bands. then i move the outside edges of the ribbons to the marks that i had made, and staple them down. after that is done, flip it over and pull the ribbons over to the marks, making sure that the ribbon is tight, and staple the ends down to the opposite edge from the other side (staple the one set of ends to what would be considered the top, and the other set to what would be considered the bottom), you can see this in the one pic, the stapled ends are pointing to the back, and the ones to be stapled towards the front. now that the horizontal ribbons are in place, you need to lay out the x, making sure to keep the edges of the x to the inside edges of the horizontal ribbons.

 Thanks for the tutorial, Dan.