Mike Stafford
Member
- Messages
- 2,941
- Location
- Coastal plain of North Carolina
I am a bit embarrassed to show my slapped together fixtures that I came up with for my knife making exploits.
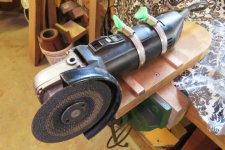
The first is a fixture that holds one of my 4 1/2" grinders so that the grinding disc is vertical. This orientation allows me to grind to the line almost any concave shapes that I come up with. I nibble away as much as I can with the cutting disc. Once that is finished I can nibble right to my pattern line with grinder disc held by this fixture. The second picture shows the guts of the construction. I had to add those two little strips of wood to raise the grinder off the screw heads used to fasten the band clamps.


My first attempts at grinding bevels on the knife blanks was very irregular. It is very hard to hold the knife and move it consistently across the grinder belt at the same angle and with equal contact the total length of the blade. I saw a video of a fixture made by a professional knife maker who created a grinding jig using a piece of angle iron. I decided to duplicate it with what I had on hand. I slapped together some plywood at more or less a 90 degree angle. One leg would be the face upon which the blade would be clamped and the other would be the face which would ride against the sander table.

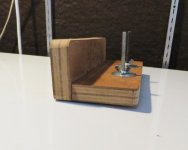
This picture shows the basic construction. The long threaded bolt serve as handles and make it easier to control.; The fender washers provide locking pressure for the wing nuts I use to lock the angle of the front face.

This picture shows the underside of the leg that rides along the sander table. I counter sunk the T-nuts so that I could sink the heads of the bolts deep enough to where the other leg would be at 90 degrees if I wanted. I ended up grinding off the slotted round head portion of the bolt as the unit would slide better without the slot catching on any irregularity in the table. How far the bolt heads are extended determine the angle of presentation to the sanding belt. The only thing I have to be careful to ensure is that the bolt heads are equally extended so that the fixture does not rock. I measure the angle with a clear protractor. I am using 7 1/2 degrees on each side of the blade. Before I start grinding I paint what will become the beveled edge with market . Then I scribe a line with a marking gage down the center. As I grind I do the same number of passes on each side and when the two bevels meet almost at the center I am through grinding The rest of bevel will be created when I sharpen.
 Here you can see the way the bolt heads when locked in place elevate the back leg.

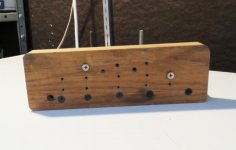
This picture shows the front face. I have pre-drilled a bunch of holes into which I can screw dry wall screws. The holes are equally spaced from an arbitrary center line. The dry wall screws serve only to locate the blade and support it so that it is presented to the sanding belt the same way on both sides to create an equal bevel. When I move the blade to grind the other side I also move the screws to their opposite holes on the other side of the center line. That way the bevel will be equal on both sides. Once the blade is positioned on top of the screw; (it actually rests on the head of the screw), I clamp it in place with small clamps in the area where the handle will be to hold it firmly in place. Obviously the clamps and their handles have to kept out of the line of fire. The wooden face /edge that rides on the sander table is waxed so that it slides easily. I make the same number of passes on each side to get an equal bevel.
I would just like to say that you cannot buy fine fixtures such as these at the big box or hardware stores. They may not look like much but they do the job.
The first is a fixture that holds one of my 4 1/2" grinders so that the grinding disc is vertical. This orientation allows me to grind to the line almost any concave shapes that I come up with. I nibble away as much as I can with the cutting disc. Once that is finished I can nibble right to my pattern line with grinder disc held by this fixture. The second picture shows the guts of the construction. I had to add those two little strips of wood to raise the grinder off the screw heads used to fasten the band clamps.


My first attempts at grinding bevels on the knife blanks was very irregular. It is very hard to hold the knife and move it consistently across the grinder belt at the same angle and with equal contact the total length of the blade. I saw a video of a fixture made by a professional knife maker who created a grinding jig using a piece of angle iron. I decided to duplicate it with what I had on hand. I slapped together some plywood at more or less a 90 degree angle. One leg would be the face upon which the blade would be clamped and the other would be the face which would ride against the sander table.

This picture shows the basic construction. The long threaded bolt serve as handles and make it easier to control.; The fender washers provide locking pressure for the wing nuts I use to lock the angle of the front face.

This picture shows the underside of the leg that rides along the sander table. I counter sunk the T-nuts so that I could sink the heads of the bolts deep enough to where the other leg would be at 90 degrees if I wanted. I ended up grinding off the slotted round head portion of the bolt as the unit would slide better without the slot catching on any irregularity in the table. How far the bolt heads are extended determine the angle of presentation to the sanding belt. The only thing I have to be careful to ensure is that the bolt heads are equally extended so that the fixture does not rock. I measure the angle with a clear protractor. I am using 7 1/2 degrees on each side of the blade. Before I start grinding I paint what will become the beveled edge with market . Then I scribe a line with a marking gage down the center. As I grind I do the same number of passes on each side and when the two bevels meet almost at the center I am through grinding The rest of bevel will be created when I sharpen.
 Here you can see the way the bolt heads when locked in place elevate the back leg.
This picture shows the front face. I have pre-drilled a bunch of holes into which I can screw dry wall screws. The holes are equally spaced from an arbitrary center line. The dry wall screws serve only to locate the blade and support it so that it is presented to the sanding belt the same way on both sides to create an equal bevel. When I move the blade to grind the other side I also move the screws to their opposite holes on the other side of the center line. That way the bevel will be equal on both sides. Once the blade is positioned on top of the screw; (it actually rests on the head of the screw), I clamp it in place with small clamps in the area where the handle will be to hold it firmly in place. Obviously the clamps and their handles have to kept out of the line of fire. The wooden face /edge that rides on the sander table is waxed so that it slides easily. I make the same number of passes on each side to get an equal bevel.
I would just like to say that you cannot buy fine fixtures such as these at the big box or hardware stores. They may not look like much but they do the job.
