Map Chest in walnut

You are both way too generous in your praise. However undeserving I am I still appreciate it very much.
Yeah Rennie, you're obviously just a hack and it shows in your work. :rofl:

(Add me to the crowd that totally admires everything I've seen you build over the years.) ;)
 
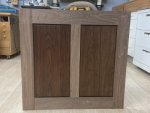
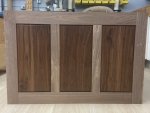
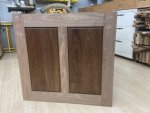
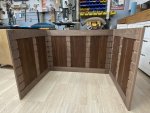
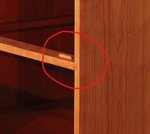
I oiled the panels and decided to do a little test fitting. Everything goes together as it should but the problem of how to attach the top is still bugging me. No way I can reach into one of the drawer openings as they are too narrow. I have hit upon an idea that I think will work.

The top is a glued up panel. My thought was to have a 3/4" piece of plywood cut to fit snuggly into the top of the cabinet. I'd attach that plywood (using elongated holes) to the underside of the top. It would then drop in like a bottle stopper. The ply can then be attached to the sides and back with pocket hole screws. The challenge was how to reach all those screws? Here's the solution - I will fit and glue all the dust frames in place but without the 1/4" ply. This allows me full access from the bottom of the cabinet to attach the top. I'll simply remove the bottom of the grove leaving a down facing rabbet into which I can drop the ply later from the bottom of the case. A few dots of glue and maybe a trim piece to hold the ply in place can be done one level at a time.

I need to run that through in my head a few times but at this juncture I don't see why it would not work.


IMG_0696.JPEG

IMG_0695.JPEG

IMG_0694.JPEG

IMG_0693.JPEG
 
Add the top to the sides, slide in the dust panels, then add the back.
could have... Not sure how I would attach the back to the top should I do that. Also, getting the front drawer dividers in requires 'spreading' the front apart ever so slightly (due to the stopped dados) which is one reason the top gets attached last as it would prevent the sides from being moved out.
 
Slept on this and gave it some more thought. I need only remove the shoulder (?) of the groove on the side and center stiles leaving the groves in tact on the rails. By doing this I maintain the integrity of the stub tenon joinery and, I believe, the ply panel can be 'flexed' in at the ends and then I will glue in the cut offs to hold the panel in place. All of this done after the top is attached and with the cabinet upside down.

Dust frame.jpg
 
Picking up on Dan's suggestion of sliding in the dust panels. If a 'dadoed' look is acceptable on the front, the dados could be extended out to the front, thus allowing the dust panels to be slid in after side/back/top assembly. Thi way you would not have to notch the front rails of the dust panels, not spread the sides to get them in. Just a thought.

Great looking so far.
Thanks Robert. I considered the through dado but opted for the 'cleaner' look of the stopped dado. The customer is looking for a 'traditional' piece that will be the focal point of the room. This, to me at least, spelled stopped dado.
 
A trim piece on the front could replace the stopped part of the dado... That moves the problem to how to fasten that of course... And might not fit the design but I can see a couple ways how that could possibly work.
 
The top most divider dado could come all the way to the front but, terminate in a sliding dovetail. One "last in" divider could give you the room to use typical buttons or figure 8's. The trim could slide into an exposed dovetail. Very traditional. The top most position creates a visual attraction at the top. The balance are stopped. Just thinking out loud.

Not exactly your requirement but, this explains what I mean:
Stretcher End Detail.jpg . Stretcher End Detail-2.jpg
 
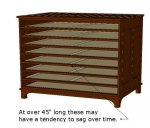
Another challenge has arisen - just a concern right now, but I'm trying to think ahead. The drawer dividers are over 45" long and I think that, over time, they will have a tendency to sag. Initially I had wanted to go with inset drawers faces and sagging dividers would really look bad. A solution I am considering is to plow a groove in the underside of the divider and epoxy in a piece of steel bar stock. Guaranteed this will discourage the dividers from ever straying from the straight and level.

Another thought is that I will not do inset drawer faces and go with a 1/4" overlay instead. This actually fits well with the style and is a bunch easier than inset when dealing with such a long drawer that will emphasize any deviations in the gap.

Divider reinforcement_1.jpg

Divider reinforcement_2.jpg
 
if the weight is borne by the edges of the drawers, and not in the middle, where is the load to cause the sag? i have a bookcase that i made when i moved in here (about 20 yrs ago), with a boatload of books on the shelf, and no sag yet. i think you are over worrying this.
 
That is a fairly wide span for 3/4" material so I get your concern. The question is, will the removal of material from the divider and the addition of the weight of the metal do more harm that good? You may want to consider aluminum or even fiberglass. I'm thinking out loud as I write this and feel like the laminating effect of the epoxy/wood/metal will add strength. Is overall weight a factor? You're looking at 3/4 of a pound per bar.

If you go with overlay drawers you could lower the number of drawers to 7 and make the dividers 1" stock . . . decisions, decisions.
 
This is why I love this place! So much knowledge to be tapped into. 9.5 oz does not seem like much, but I do believe I can get the same size stock in aluminum so that is something to consider.

I might be overthinking this, true, but it is a long span and during some test fitting I noticed it did not take much pressure to get the divider to deflect. There is a point load mid-span were the center stile of the dust panel meets the divider. The combined weight of the stile and plywood panels, over time, could cause the divider to sag a bit. Also, over such a span, I have to consider there may be some natural wood movement as well.

I’ve pretty much convinced myself to go with 1/4” overlay drawer fronts. That willl help.
 
How about using figure 8 washers to attach the top. A Forstner bit counter bore in both the frame and the overhang of the top would let you attach the washers to the top of the frame and then attach the top to the washers from the outside of the frame. I used these once when I had a similar problem, and they worked quite well.


Charley
 
Top