New greenhouse project

Darren Wright

Administrator
Staff member
Messages
20,168
Location
Springfield, Missouri
7C378B31-0696-41B3-87FB-CC4A91C8934C.jpeg


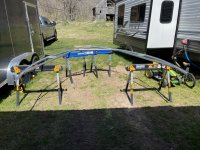
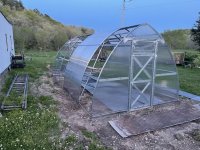
About 1200 screws with matching nuts are in my near future to assemble this bad boy. :doh:
8A4EBB99-97AD-4A0E-AD15-070D4A1EAA66.jpeg

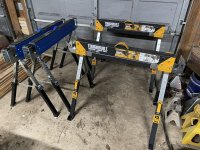
I did pickup another set of saw horses to make assembling a little more comfortable.
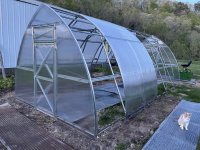
3BDE06F0-DCB4-4494-91BE-C9E7252B0ADD.jpeg

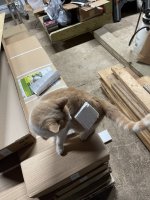
I also had a little fun messing with the cat and petting it with some styrofoam chunks. After a few shocks from the static he wasn’t amused anymore, but I was. :D
55EE4204-E03A-4BC8-9003-F60CD99744B2.jpeg
 
Should be fun. Is that the 10'x20'?

Maybe a nice new little electric screwdriver is in your future? That was sort of mandatory kit back in the 90's when assembling a bunch of PC cases (plus bandaids for the break cut sheet metal they all used back then).

The last greenhouse I built.. almost 20 years ago (sheesh) I put on a treated 4x4 footing set on concrete piers with the top of the 4x4s at ground level on the outside. I bolted the 4x4s to the anchors and then set it all up shimmed the 4x4s level and poured the concrete into the predug holes for the pier. Made it easy to level anyway, and I got another 4" of head room from digging out the inside to the depth of the 4x4s (I left the outside buried to seal it up). Looks like yours is taller though so the extra height might not be quite as helpful :)

One other note: imho a venting kit and preferably an automatic venting kit is almost mandatory with these. I'm guessing you probably already have something in mind, but it can get WAY to hot in a greenhouse like that way faster than you'd think.
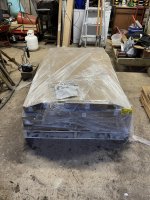
 
What is the greenhouse skinned with?
6 mm polycarbonate.

This is the kit: https://plantagreenhouses.com/collections/sungrow/products/sungrow-20

It will handle snow loads of 75 psf (6 feet of snow) and up to 65mph winds. I have watched reviews of folks in Canada using it over winter, but may need to watch your snow loads on it

I've also got a DIY kit for a gothic that you bend the pipe for I still want to build, but considering one of these kits for the larger ones with double wall plastic: https://lrshelters.ca/

Should be fun. Is that the 10'x20'?

Maybe a nice new little electric screwdriver is in your future? That was sort of mandatory kit back in the 90's when assembling a bunch of PC cases (plus bandaids for the break cut sheet metal they all used back then).

The last greenhouse I built.. almost 20 years ago (sheesh) I put on a treated 4x4 footing set on concrete piers with the top of the 4x4s at ground level on the outside. I bolted the 4x4s to the anchors and then set it all up shimmed the 4x4s level and poured the concrete into the predug holes for the pier. Made it easy to level anyway, and I got another 4" of head room from digging out the inside to the depth of the 4x4s (I left the outside buried to seal it up). Looks like yours is taller though so the extra height might not be quite as helpful :)

One other note: imho a venting kit and preferably an automatic venting kit is almost mandatory with these. I'm guessing you probably already have something in mind, but it can get WAY to hot in a greenhouse like that way faster than you'd think.
Yes, the 10x20. I didn't get the auto opener vents, as they were out of stock. I plan to order the mechanism for the manual ones I have now when they get them in stock.


Funny, I just picked up a new first-aid kit for the grandkids visit, but probably will be my best tool on this project. The parts do have that same feel as those old pc cases. I think my stained glass work muscle memories have me handling those just like glass, so hopefully won't be an issue. I have the feeling my cordless screwdriver is going to get a workout on this, I also have one of those magnetic wrist screw holders that probably will come in handy along with the magnet on a stick to pickup those dropped pieces to save some bending over. ;)

I like the idea of doing piers. I was thinking just some concrete footers in the ground as we do have pretty good drainage here. This kit does come with two options for securing it to the ground. One has some little "T"s that are under each leg that get buried in the ground and act as a footer/anchor. The other are L brackets that lag bolt to concrete or wood. I was considering some treated wood on top of the footer and making a bit of a step-over to add some height.

At this point I've got just as much work to get done on the site prep, as I do the assembly, though I think I've got the assembly part thought through at least. :)
 
One other note: imho a venting kit and preferably an automatic venting kit is almost mandatory with these. I'm guessing you probably already have something in mind, but it can get WAY to hot in a greenhouse like that way faster than you'd think.
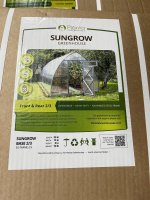
Since the automatic vents are the same door/frame as the automatic. I emailed the supplier this morning and asked if I could just buy the automatic vent mechanisms, they had the parts in stock, so they should be here well before I finish assembly.
 
SWMBO and I walked the yard after lunch and found a spot we both agree on. Though I think we'll just do the ground anchors for now. Unfortunately it is right off the back of the garage, where I was considering doing the lean-to for the tractor. I'll still have some room for that, but only about 15' wide, so some equipment will still need to be outside.

However, there are some benefits to the location. It's flat and very close to the house, enough so that even her grandpa can walk out to do stuff in there if he wishes. The outside water hydrant is about 25' away. It's also where I can run some heating to it off the outdoor wood boiler, which I'm planning to run to the garage as well. I think we can also use some space for tool storage/garden shed on that lean-to as the greenhouse has a door on each end

My wife is wanting to grow some tropicals in this one year round.
 
Since the automatic vents are the same door/frame as the automatic. I emailed the supplier this morning and asked if I could just buy the automatic vent mechanisms, they had the parts in stock, so they should be here well before I finish assembly.
Yeah the wax filled cylinder ones seem to work pretty well if you can't get the "official" ones you can probably retrofit some in with a few custom brackets... but having ones made for it would be much easier (cause it's not like you have anything else to work on .. clearly.. :rolleyes:)

I would advocated some sort of piers and 4x4 or 4x6 base frame if you can do it up front as it really made leveling soooo much easier and faster (since I only had to get the ground "close" and not "perfect") and I suspect retrofitting might be .. interesting... Not having the sheathing on when you screw it down makes access a lot easier and removing/replacing the sheathing was sadly prone to damage issues where i tried it.

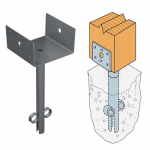
When I did the piers I didn't do anything really fancy I just dug rough post holes where I wanted them, used the simpson anchors as below (it was a slightly different model.. but what the Despot had in stock and 20yrs will change things.. same idea) with the 4x4's bolted into them then leveled the whole frame assembly and dumped some pre-mix posthole bags into the holes. Boom done (where boom is letting it set overnight before putting the greenhouse on top). Where the 4x4's intersected I just used lap joints and lag bolts which was also quite fast and sturdy.

I didn't bother trying to pre-level any of the concrete or use "proper" tubes or anything because.. it's a greenhouse.. so.. yeah.

1648579058712.png
 
10x20 is a good size. The area I am using for Hydroponics is the same size and I already had a concrete slab poured. I has the third stall for my shop on one end (which a roll up door) and the 20 foot side is next to the house. I am planning on putting up a lean to frame work and using nursery netting make an enclosure to provide shade in the hotter months and perhaps extend my growing season.
 
What kind of leverage do they have then on your use of the high tunnel?
On mine I had to plant in the dirt for 3 year but when I asked them they told me that had change to 1 year. You can use raised beds as long as it is in contact with the dirt. After the first season I could do what ever I wanted with it.

The one I had was bought through Morgan County Seed Co. It was one heck of a Tunnel and I could get the parts that I would of needed to convert to a greenhouse If I wanted. It was a 30X72 with W bracing and 6' sidewalls and Ridge Vent. It stood up to a close to 80mph wind more than once. I HIGHLY recommend them.

Which ever one you would get do NOT get a FarmTek they are to light of frame

I would think you would more than qualify for one Jonathan and you can apply every year for another one. They were after me to apply again as if they dont use up all the money then they get less the next year
 
What kind of leverage do they have then on your use of the high tunnel?
I was looking more into it and planning to contact our local agent about the water management initiatives as well as the hoop houses.

My wife's grandfather had worked with them years ago for planting trees along the creek. His feeling is that the trees, though they've curbed erosion, have contributed greatly to the amount of flooding as debris gets caught up in it for the farm. When you look at it causing the water to get out of the banks and wash manure and fertilizers downstream, I see a problem. I think the plan he was on expired a few years ago, but they were getting about $1400 a year when it started and that dropped down over time.

I feel like they probably will work with me for funding to get the creek banks cleared up, either by bring some equipment in and dealing with the debris, or paying for equipment to do the job, but either way I'll have to work from the plan they come up with. Same with hoop houses, as long as I'm sticking with the plan of use, should be able to use them for my intended purposes.
 
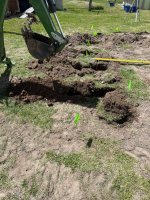
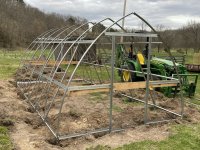
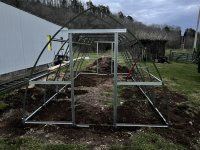
I setup the laser transit and dug the holes to a couple of spray paint marks on my backhoe bucket, then did the final depth by hand.
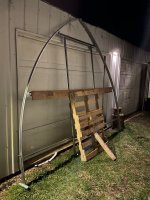
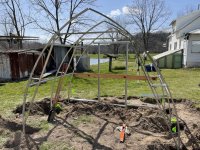
Once I had those done, assembling the arches together went pretty quickly.
57CFC4A7-BB34-4B5D-9EC3-53F911ED48DA.jpeg 53DC0F40-A1F8-4D8A-9159-DE6F74305A94.jpeg

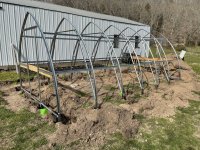
I still need to do a final check for square, it’s close, but added the lower cross braces since my last check, then need to do a string line to line up the middle arches again.
0E46BB77-A667-4D39-9520-058E56793C82.jpeg 456D7860-5307-4F90-BAC7-C6F632D43DC0.jpeg

I’ll get thing square again, backfill, then I have a couple of rows of braces at the top to install on each side to install before starting the siding (on a calm day). ;)
 
Top