- Messages
- 8,564
- Location
- Williamette Valley, Oregon
Haven't done a huge amount of spinny work lately (plenty backed up.. just other projects keep interfering).
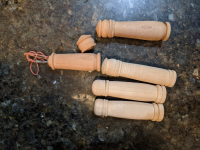
But I had gotten some more leather needles in and the collection was wanting a better storage solution, so I went out the lathe and whipped up handful of needle cases. Pretty much just functional, didn't sand them or anything but still kind of a fun little project.
I used 5 tools
Roughing, Chucking, Misc..
Traditionally these were left unfinished. I made the mistake of waxing one.. the lid would slide on.. then being an airtight friction fit pop right back off with speed.. so Don't use wax anyway I guess if I was going to finish them I'd put something quick like a shellac friction coat on right when I parted them off and just leave the inside unfinished still.
The third one up I made before I figured out the finish the lid and body together idea (obvious in retrospect after doing one). so it doesn't match up quite as good.
And yes the lid if partially off of the second one up.
 d
d
But I had gotten some more leather needles in and the collection was wanting a better storage solution, so I went out the lathe and whipped up handful of needle cases. Pretty much just functional, didn't sand them or anything but still kind of a fun little project.
I used 5 tools
- A skew (1" a smidge smaller would be more agile here.. maybe 3/4" or even 1/2 but the 1" was front and center so it got used).
- Parting tool
- small caliper
- 1/2" drill "chucked" in a vice grip
- 7/16" (or 29/64" although I thought the junction was a bit thin with that..) drill also chucked in another vice grip.
- Other folks might want to rough with a roughing gouge or do the detail with a spindle gouge, but for quick projects like this the fewer tools imho the faster/better.
Roughing, Chucking, Misc..
- Set your calipers to the diameter of your 1/2" drill bit.
- Turn one end of a blank round with a bit of a shoulder and chuck it up. I was using blanks long enough I could get two cases out of the one piece. These are a wee bit over 1/2" OD so started with about 3/4" - 7/8" square stock. I was just holding the off end in the chuck to rough out the bit-of round. I left most of the blank squire except the bit right in the chuck - that give the largest shoulders since you don't have a lot to work with.
- Rough turn the stock round for a smidge over the length of your case.
- Pull back the tailstock and using the tip of your skew mark the center of the blank.
- Drill in with the 1/2" drill for a wee bit under 1/2" (I marked the desired depth with sharpie on both drills)
- Clean up the entrance to hole, slightly undercut the edge from the end in with the skew
- Part off leaving 3/8" of wood past the end of the hole, try to leave the nub on the not-lid part as you'll want to use the tailstock pressure on the top of the lid later and the nub there makes it harder to center.
- Clean up the end of the workpiece and again mark the center with the tip of the skew
- Drill in to depth with the smaller bit (7/16"), pulling back frequently to clear waste. I like to have the tailstock center just past the end of the bit so I can use it as a reference
- Bring the tailstock up for support
- Using the calipers as a guide, cut a tenon shoulder on the body of the case until the calipers just clear so the tennon will fit in the 1/2" hole in the lid. I was making the tenon about 3/8", a little longer maybe 1/4" may well be better.
- Undercut the shoulder of the tenon just a tiny bit with the skew.
- Pull back the tailstock and press fit the lid on, tweaking the tenon diameter slightly if needed.
- Bring the tailstock back up to hold the lid in place
- Turn the body and lid to even round.
- Detail body and lid how you'd like. I've found that leaving a bit of material at the bottom and taking them quite thin at the top makes it so they'll stand up pretty easily. A bead around the top end of the body helps re-enforce it.. I've mostly been putting a matching bead on the lid which hides the junction some. But there are as many designs as you might like to make.
- Part off the very tip of the top last, and do any sanding you want (if any.. hah)
- Part off the bottom, taking some care to undercut it a bit so the outside edges are the "low" part to enable it to stand up.
Traditionally these were left unfinished. I made the mistake of waxing one.. the lid would slide on.. then being an airtight friction fit pop right back off with speed.. so Don't use wax anyway
The third one up I made before I figured out the finish the lid and body together idea (obvious in retrospect after doing one). so it doesn't match up quite as good.
And yes the lid if partially off of the second one up.
 d
d