
- Messages
- 16,933
- Location
- Reno NV
Projects beget projects. As part of my guitar project, I need to use my cnc to help me build some jigs. Unfortunately my old OX was a little small for the task.
On the upside, I did get the OX running, so theres that. Still on the upper part of the upside, I've got the CNC That Carol Started and Don got built and running.
I figured if I was going to use it, it was a good time to redo things a bit to meet my needs. What I'm going to do differently is:
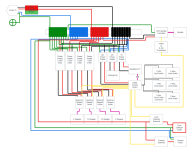
This is probably a work in progress, and it's messy, but It helps me understand all the components I need to account for. This in no way reflects how things will be layed out physically. Just kind of figuring out what I need and where they connect.

What I'm planning on doing for the cabinet.
I'm going to build an electronics enclosure with positive pressure ventilation for dust control and recess it slightly.
Drawers for storage of all items. Thats just a rough drawing, I'll probably have some narrower drawers on top and deeper ones on the bottom.
On the right side at the back will be a cubby for material storage.


As part of the prep I went and looked for all the Carol and Don CNC Threads I could find. Let me know if I missed anything.
Carols Threads
 familywoodworking.org
familywoodworking.org
familywoodworking.org
familywoodworking.org
familywoodworking.org
familywoodworking.org
familywoodworking.org
familywoodworking.org
familywoodworking.org
familywoodworking.org
familywoodworking.org
familywoodworking.org
familywoodworking.org
familywoodworking.org
familywoodworking.org
familywoodworking.org
familywoodworking.org
familywoodworking.org
familywoodworking.org
familywoodworking.org
familywoodworking.org
familywoodworking.org
familywoodworking.org
familywoodworking.org
familywoodworking.org
familywoodworking.org
familywoodworking.org
familywoodworking.org
familywoodworking.org
familywoodworking.org
familywoodworking.org
Dons Threads
familywoodworking.org
familywoodworking.org
familywoodworking.org
On the upside, I did get the OX running, so theres that. Still on the upper part of the upside, I've got the CNC That Carol Started and Don got built and running.
I figured if I was going to use it, it was a good time to redo things a bit to meet my needs. What I'm going to do differently is:
- Convert it to a grbl controller.
Mach 3 is fine, but I've never used it and just dont feel like learning another system.
I also don't want to have to have a pc directly connected to the machine to run it. I've got a bunch of pc's laying around and one less machine to take care of is a bonus. - Adding a raspberry pi to the mix
This will let me us CNCJS to run it. I can control it and run it directly from a tablet, use my phone as a pendant for jogging, etc.
Will allow me to add a web cam for timelapse recording and monitoring. - Reconfigure the base
My shop is small and Anytime I can add shelves or storage to project I'm all in for it. - Enclose the electronics
My shop can get pretty dusty at times, so I'm going to enclose the electronics and use filtered positive pressure ventilation to keep the insides dust free. - Add some 3d printed doodads here and there, lol.
This is probably a work in progress, and it's messy, but It helps me understand all the components I need to account for. This in no way reflects how things will be layed out physically. Just kind of figuring out what I need and where they connect.
What I'm planning on doing for the cabinet.
I'm going to build an electronics enclosure with positive pressure ventilation for dust control and recess it slightly.
Drawers for storage of all items. Thats just a rough drawing, I'll probably have some narrower drawers on top and deeper ones on the bottom.
On the right side at the back will be a cubby for material storage.
As part of the prep I went and looked for all the Carol and Don CNC Threads I could find. Let me know if I missed anything.
Carols Threads
Owning the ShopBot
Since Rob wanted to know and because I didn't want to thread-jack the on-going cnc builds. Going back about 15 years or so, I owned a 4'x8' work area ShopBot. It was my first venture into CNC machines. And it was a blast! I got it to make the router jigs I had invented and was selling. I...
familywoodworking.org
More CNC
This is for Rob. Just spent a hour at openbuilds.com lusting over OX CNC machines. Remember, I am not responsible for your credit cards.
familywoodworking.org
A new CNC build.
Been working up to this for a while. Pulling the trigger. The machine will be based on the Computer Router Parts machine. http://www.cncrouterparts.com/index.php I have an email out to them with the first of a bazillion questions. I saw the real thing last Monday. Was very impressed...
familywoodworking.org
New CNC Build - Day 5
Order is in! :beer: :bounce: :champagne: I am officially excited!
familywoodworking.org
Work holding systems
I have looked at your photos of holding your projects to the CNC table for milling and see and read about different systems. Then Brent pointed out he is copying Jason's holding system. So some discussion is in order. Dan and Bill seem to be screwing the workpiece directly to the table...
familywoodworking.org
Back to my CNC - finally!
Spent part of Saturday assembling my CNC. My head has not been into it for months, so a slow start. And ran into a problem. Today I figured it out. WooHoo! I put some hold downs on the wrong face of an extrusion. Will sort that out this next Saturday. Time to get excited about this again!
familywoodworking.org
What I did this weekend on my CNC
Front view. Back side of the gantry. Lots of parts from 5 different boxes. The boxes are empty and there are no parts left over. Yesss! Next up is to measure the base front edge relative to the z-axis to determine the size of the rolling cabinet this will be mounted on. Tweak the all...
familywoodworking.org
Another step on the CNC build
It maybe isn't the biggest deal but I got so stoked with it I forgot pictures. As you know, I am planning a 4th axis motor to turn a lathe. You all just saw Leo's video of his rotary axis. Mine is a repurposed mini lathe that will be powered with a NEMA motor. Today I got my hands on a dead...
familywoodworking.org
More CNC questions
I know Leo made leg extenders for his machine to get the table at a height he likes. I'd like to make my cabinet the right height to begin with. And I know we had a discussion a long time ago about the composition of the table. But I still have questions. So the base is made up of the 8040...
familywoodworking.org
Progress!
WoooHoo! Tonight I got the CNC switch plate cut out on the laser. We did it in cardboard for proof of concept. I discovered a new definition for CAD. Cardboard Assisted Design. :rofl: The plate fits. I will make the screw holes smaller and then cut it out in acrylic. You can see the...
familywoodworking.org
More progress!
I love simple, eloquent solutions. So I was designing a vacuum hold down table for the CNC. Actually there will be two of them. I am working on the vertical one. I got some vacuum ball valves from MP Power. Then came the plumbing. The table is HDPE plastic. Thought about routing a...
familywoodworking.org
CNC Cabinet starting to come together
When Larry, Glen and Jim were here a while back they saw a bit of the CNC cabinet build I have been working on as time and health issues permit. A while ago I showed a picture of the cardboard template for the switch panel. Last night I got it cut out in red acrylic. The laser does such an...
familywoodworking.org
Latest in CNC cabinet
Control panel and vertical vacuum table. Wish it was all connected on the back! But it is coming along. CPU is installed along with electrical boxes. Waiting on fuse panel and fuses and more valves. The plate beneath the switched will get 2 master control vacuum valves, one for the...
familywoodworking.org
CNC cabinet update with pix
Been busy this week. Got some stuff done. Here is the front of the cabinet. Closer shot of the control panel. On the inside, lots of plumbing. First, from the vacuum pump. Snagged at a yard sale, cleaned up, new paint, new mufflers, a filter, and good to go. Behind the vacuum table...
familywoodworking.org
Another piece of the puzzle
Today I unpacked this: Inside was this: And then we have this: A water cooled spindle with inverter form China. Thanks, Leo. But there are a few complications. A little one: The two screws for the wire clamp are missing. Leo, any idea what size they should be? A bigger problem...
familywoodworking.org
Spindle cooling system
So, the new water cooled spindle arrived. Been designing the cooling system. - 7-10 gallon reservoir (probably a plastic trash can) with a submersible pond pump...
familywoodworking.org
Dons Threads
CNC conundrum...
AS you all know Carol was in the process of building a CNC and was able to get the bones put together before she got ill...... when she knew she was terminal we had many discussions as to what was to be done with all of her "Cool Tools" as she called them. Most of the shop went to a young man...
familywoodworking.org
The New Carol CNC.... design.
Well taking all the extrusions that we unloaded from the trailer I was able to come up with design. Pardone my poor drawing my sketchup skills are a bit rusty and I am still learning the newest version. The first phase will be to build the base so I have a place to assemble the machine. Keep in...
familywoodworking.org
New CNC build.
OK time to stop designing and get to building. Today I was able in spite of a large list of projects, sneak in a day of shop time and made great progress. I didn't bother taking picture of every painful step, I was too busy enjoying my self with the build. I know I wont be able to do much on...
familywoodworking.org
Attachments
Last edited:


")

 Maybe you took the saying “in case of doubt build it stout” too far