OK,
I am moving along nicely.
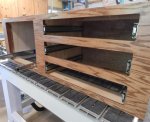
I have assembled the carcase and front panel. It is all glued and made as a removable unit. If I ever want to vertical clamp something large the cabinet can easily be removed. First the drawers, then the whole carcase.

View of back, side and top of carcase.
The carcase is build strong enough so as to be able to put my rotary axis on top, which is about 6" below the table top and that gives me some additional "Z" axis for the rotary.
I gave it 3 coats of poly. I didn't stain it, after all it's just a shop cabinet

I cut the carcase sections on the CNC with a 1/4 end mill. That left a 1/8 radius in the corners, so I did a 1/8 corner round on the router table. Looks cool.

I painted the machine frame with some REALLY nice oil based Sherwin Williams paint. Brushed on. Still, it's at least as good as the trim in my house.

The cross beam is made to just sit there in the bottom. It gives me the strength I need to mount the rotary axis on top of the cabinet. The cabinet will just rest, nestled in the inside of the cross beam. No need for any fasteners.


The drawers are made with lap joints and glued and nailed. Done it before and it is fine on a shop cabinet. Wood is Poplar.
I made a quickie fixture to quick change the parts in and out. Litterally 15 seconds to change out the parts.
Left is raw part - right is with lap cut out.
There are 2 clamps to hold the part. The rest of the clamps are for the fixturing.
The set up took 5 minutes, 5 minutes to program it. About 1-2 minutes per lap cut.

I have the 4 drawers assembled and colored.
4 drawers are Bordeaux and one is green - why - I dunno, it just happened that way. One is for the water coolant drawer - suppose it should be blue. The transtint is blotchy cause it is still wet to partly dry when I snapped the pic.
I have dark gray kiazen foam inserts that will go in the drawers with cutouts for the tools that will go in there.