CHALLENGE ENTRIES HERE!

Messages
5,629
Location
Catalunya
Hi guys.
This is my entry, as I mentioned it is not finished, so I disqualify myself, but at least you can imagine how will it look.
First I glued two boards to have enough thickness, and I drew a rough outline of the shapes I wanted.
IMG_6620.JPG

Then I roughed them out with the bandsaw, and hand saws. And glued some blocks where I needed more wood.
IMG_6624.JPGIMG_6625.JPG

Proceeded to carve, and carve and carve. First with the aid of an Arbortech disc, and later with rasps and gouges.
IMG_6628.JPGIMG_6658.JPG

An this is how it will look on the wall. You can put your keys, or cell phone on the holes, and hang your coat on the big stumps and hang your kit bag or gun holster on the small ones. When not in use it is part of the decoration.

IMG_6678.JPG
IMG_6679.JPGIMG_6681.JPG
 
ok, here comes mine, a long time in the making.....
here we have the boards ripped to width, then planed to thickness and cut to length. then its on to cutting the tenons, and the bottom arch. the end parts are then glued together, and the mortices are cut. then, as usual, the much needed test fitting of the parts. then we have the start, and end of the finishing process, and finally, the finished coat rack. :thud:
002 parts cut to width and length.jpg003 planed to thickness and small parts cut.jpg004 tenons cut.jpg005 bottom arch cut.jpg006 small parts glued up.jpg008 mortises cut (1).jpg009 ends fitted to center.jpg010 start of finishing process.jpg011 backer assembled.jpg012 coat rack finished.jpg
 
Here's mine. A little light on the construction photos, sorry.

Here is the inspiration piece that my client sent me. He wanted a Greene and Greene interpretation of this design.
unnamed (1).png

We worked together on the design for a couple of weeks and came up with this.
Coat Rack view 1b 10-8.jpg

Like I said, a bit light on the build photos, but here they are. The jig used for the 'waterfall' legs and the layout for the bridle and half laps for the side brackets.
IMG_2091.JPEGIMG_2093.JPEG

All done. Things to note - wood is walnut with ebony accents. The tile is an antique Tiffany tile, 100+ years old and the "coat hooks" are actually door pulls hand forged by an artisan in Alaska. The 'frame' for the tile is Koa from Hawaii. The arched head rail is an adaptation of a "Torii Gate". A torii is a traditional Japanese gate most commonly found at the entrance of or within a Shinto shrine, where it symbolically marks the transition from the mundane to the sacred.

DSC_0305.JPGDSC_0322.JPGDSC_0328.JPGDSC_0330.JPGDSC_0324.JPG


Finally, the "show" shot. Enjoy!
DSC_0332.JPG
 
Last edited:
Well, mine got held up by the design committee, that and a couple of other small projects taking up my time. :rolleyes: She wanted a “farm” themed rack.

I can’t say there was a lot of woodworking involved, I even used scrap wood that I didn’t even need to cut. Milling consisted of just a few holes drilled.
797FF946-CDAC-48D0-BDE9-D8CA98AC2578.jpeg

Then a bit of hardware.
D4B808B6-A6EE-4FF9-A393-121AA8ACDBE9.jpeg

All the hardware was from around the barn and some I saved from the little house demo.

The hay sickles were attached using old rusty carriage bolts. Some cup hooks used to attach the hanger.
9DFB3719-F8CA-4775-8C4C-7543587E9B28.jpeg

I cut the extra bolt length off and added a strip of wood on the back to protect the wall, will add some felt feet on them also
B8215764-F5CF-41B7-B3AB-C4ED16389C6B.jpeg

I ground the sharp points off the sickle bars
AFE04581-8CAB-4ABB-9E6B-FAEA13BD9067.jpeg

My wife's grandmother loved horses, so we used one of her wall decorations as the center piece
B480CA88-344A-4511-AE2E-50B9495381A2.jpeg
7DFA0B89-9927-4A88-B894-8A3B0D19CE63.jpeg

The final piece hung.
6A973A4A-9DF3-435B-A893-7304159C938F.jpeg

And with hats.
257CF3D7-E596-4679-B7BC-A74D9B625AC5.jpeg
 
I took my idea from a Sam Maloof piece. My hooks are different than his but carry the same feel.

Coat Rack (1).JPG

This is a simple piece but I wanted to try my hand at creating a live edge look with an Arbortech cutter.

Coat Rack (2).JPG

Coat Rack (3).JPG

I made templates for the hooks as they graduate in size.

Coat Rack (4).jpg

Coat Rack (12).jpg

The hooks glue and screw on, the rack hangs on key hole slots.

Coat Rack (10).jpg

The large hook goes at the small end which amplifies the graduation visually. This is all Sam, I would have never thought of that.

Coat Rack (17).jpg

She goes on the wall near the door in my shop.

Coat Rack (19).jpg

Coat Rack (20).jpg

Now my apron has a good home.
 
I managed to squeak out a couple of entries, just for grins. Here's the quickie. Entry number one. Less than an hour and very practical:

A trip to the recycle yard for some legally acquired woodsie materials:
IMG_7686.jpeg.
Followed by drilling some holes and adding some stainless steel hooks:
IMG_8591.jpeg.
I like working with poplar...and here it is bolted to the outside of the garage door track. Clip on hooks on top and heavy duty hooks hanging.
IMG_8588.jpeg.
The new poplar rack replaces this mess:
IMG_8585.jpeg.
Already full up and working like a charm:
IMG_8618.jpeg
 
Entry number 2, a combination of flat work, turning and metal, including various spalted woods, cherry, stainless steel and LED lighting.
The plan. Old school pencil on tracing paper. A cherry rectangle with some art work in the middle and turned balls on stainless steel pedestals to hold coats and hats.
IMG_8668.jpeg.
Starting with some cherry gifted by an arborist friend back in 2009 and milled in my driveway.
DSC04629.JPG,DSC04639.JPG ,DSC04642-c.jpg.

Pieces selected and prepped. 7* bevel on everything. Rails slide in dovetails on stiles to allow for adjustment of stiles to match stud spacing on wall for secure fastening. Cabinet scraper takes care of burning from the dull blade.
IMG_7802.jpeg, IMG_7796.jpeg ,IMG_7797.jpeg.

Turning the balls from various spalted woods using a Vermec sphere jig, drilling and buffing before finishing.
IMG_7743.jpeg,IMG_7746.jpeg ,IMG_7748.jpeg.

,IMG_7757.jpeg ,IMG_7725.jpeg ,IMG_7825.jpeg.

Thick wall stainless steel tubing for the pedestals. Test layout before finishing.
IMG_7717.jpeg, IMG_7687.jpeg ,IMG_7882.jpeg ,IMG_7848.jpeg.

A few coats of Antique Oil on everything. Then assembled and tested on the wall.
IMG_7861.jpeg,IMG_7891.jpeg ,IMG_7870.jpeg ,IMG_7928.jpeg .

And I turned my back for just a second.
IMG_7930.jpeg.
It took a bit to sort out user guidelines and realize a mirror was needed to lighten up the room.
IMG_8242.jpeg.
Then it seemed like the mirror wasn't enough, so another design modification occured. LED's added.

IMG_8263.jpeg.
(To be continued.)
 

Attachments

  • IMG_7813.jpeg
    IMG_7813.jpeg
    107.1 KB · Views: 10
Well, I don't reckon I'll be winning anything with this one given where I am and and what fantastic work y'all have done.. Man everyone has certainly outdone themselves again!

But I'm a good chunk of the way there so I'll go ahead and share what the at the deadline piece looks like anyway.

The basic idea is a coat, hat, scarf, gloves rack that will fit into a nook right inside of our doorway. I'm making it all out of alder wood I had in the shop so I'm a wee bit limited on materials and making it work with what we have (I'm trying to cut down the stash and didn't really have anything else big enough.. I was originally going to use oak but that would've required buying some pieces or a much more complicated design it turned out). This is why the right side is a smidge thicker so it will fully fill the hole (and that's the dark/wall side) so it works out.

So this is the "current state". I still have to profile the sides, mortise in the little rail braces/supports, and add a slightly thicker top rub rail to the back. And then of course finish and install it...


1680319230886.png

This is what the side profiles will look (except of course smoother heh) like; the curves end on the top right at the top of the top rail and on the bottom right under the bottom shelf.
1680319246228.png

I started out by splitting a board and gluing it back up

1680319271895.png

Once I finally figured out how to sharpen and more importantly set it the scraper works really really well for cleaning these up. I've mostly used card scrapers but I'm starting to really like this rig.

1680319287318.png

Cut some boards for shelves and rebaded the back piece to fit them in.. Plus a "test fit" for a hat.

1680319317629.png

Some rebates on the side pieces

1680319335541.png

1680319359815.png

A dry fit, the whole assembly kind of acts as a box beam..

1680319394416.png

Digging through the hardware surplus box we found some hooks that should give us a nice mix of coat and hat hangers. I also decided I needed a bit more width on the back piece so glued on another section.

1680319410974.png

And no pictures but also cut the rails and little spacer/supports you see in the first picture.
 
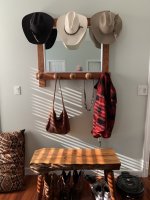
OK, I'm way late to the party and still not happy with the outcome, but this will have to do for now. I may completely start over at some point and just re-use the hardware. My design constraints were A) make something SWMBO would approve of, and B) spend as little money as possible. We only have one place in the house where a coat rack would fit, and it was already occupied with this:
IMG_1559 - 800.jpg
I wanted to build something with more capacity since the one we were using was always overfilled, with multiple things on each hook.
IMG_1558 - 800.jpg
My wife is into dogs and birds. I happened to find some hardware on sale at Hobby Lobby that checked both those boxes, and she liked it. I also figured I could incorporate the plaque from the old hanger into the new one.

My stash of decent lumber is pretty meager and I didn't have enough hardwood to do the project, so I bought some rough fence planks from Lowe's. That proved to be a big mistake, because within a couple of days the wood had warped, cupped, and twisted so badly it was unusable. I thought I might be able to make it work, but after dry clamping it I realized it was hopeless. (I could have planed it flat, but it would have end up less than 1/4" thick.)
IMG_1551 - 800.jpg
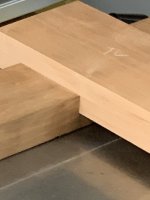
My fallback plan was to use some 1/2" cabinet grade plywood that was left over from a project I did for my sister a few years ago.
IMG_1554 - 800.jpg
I needed to edge join two pieces to get the size I wanted and since it was plywood, I used some scrap to help add a bit of strength.
IMG_1556 - 800.jpg
Sorry, no pics of the rabbet I cut to accommodate the shelf. I wanted to hide the joint on the backboard part, so I decided paint was the best way to cover it up. I had planned to go with a rustic/weathered paint job where I sanded lightly through the paint in a few places, but I wanted the wood under the paint to be dark brown, so I sanded the stained side of the plywood and used Transtint dye over it as well as the edges of the wood. Since both sides of the shelf would be visible, I also dyed the unstained side of that. I picked up a matte off-white acrylic paint that seemed like it would give me the desired look. Problem was, the Transtint bled through the paint almost as fast as I could apply it. :doh: My brain finally woke up and I used some dewaxed shellac to seal up the stained paint, and applied another couple of coats of paint over it. That finally handled the bleeding.
IMG_1569 - 800.jpg
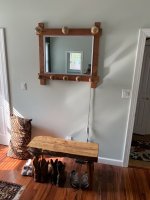
Next, I installed the dark metal hardware and within minutes my wife and I both agreed it looked bad. There was too much contrast between the painted wood and the hardware. (Sorry, I was so ashamed I didn't even bother taking photos. Trust me, it sucked.) So I pulled off all the hardware, masked off the plaque (which is glued on), and sprayed a flat bronze/gold paint that seemed like it'd work. Well, it didn't. It's better than the off-white, but it still looks like something Holly Hobby would make at craft class and show off to her housewife friends. :rofl: Anyway, it is what it is (for now).
IMG_1572 - 800.jpg

IMG_1573 - 800.jpg

IMG_1574 - 800.jpg
That's my story and I'm stickin' to it. :D
 
Top